Introduction
Welcome to our latest blog post – ‘How to Pour a Slab’. Whether you’re a seasoned professional or a DIY enthusiast, the process of pouring a slab is a fundamental skill in construction that one can learn. This guide is for all those who wish to understand this procedure and perhaps even try it out themselves. The art of pouring a slab may appear daunting, but with the right guidance and tips, it’s something that you can master.
A concrete slab, often used as the foundation for homes, sheds, and other structures, is crucial for providing strength and durability. It needs to be done correctly to ensure the structure built on top of it stands firm and lasts long. Understanding how to pour a slab correctly will not only save potential repair costs in the future but also enhance the longevity and stability of your structure.
Keep in mind, pouring a slab is not just about mixing cement, sand, and water – it’s a process that requires proper planning, preparation, precision, patience, and practice. Each of these steps contributes significantly to the final result.
In this blog post ‘How to Pour a Slab’, we’ll walk you through each step from preparing the site and creating the formwork, to mixing and pouring the concrete, then finally curing it. We will also discuss essential tips and tricks that will help you pour a slab that’s as strong as it is beautiful.
We’ve designed this tutorial to be easy-to-follow for everyone – whether you have experience with concrete work or not. So get your safety gear ready and prepare yourself for an enriching learning experience.
Let’s get started!
Understanding What a Slab Is
Before diving into the details of ‘how to pour a slab’, it is crucial to understand what a slab is. Essentially, a slab, specifically in terms of construction, refers to a single layer of solid material like concrete, wood or marble. This can be seen in a variety of structures such as floors, ceilings and pavements.
A concrete slab, which is often discussed in the context of ‘how to pour a slab,’ is typically used as the foundation for buildings and structures. It forms the base upon which the rest of the building is constructed. A concrete slab is fundamentally a flat, horizontal component of an architectural structure that is normally several inches thick and very strong.
Concrete slabs are highly integral to construction because they provide a solid, stable base beneath your structure. They prevent ground moisture from seeping into the structure and can also act as an effective barrier against pests such as termites. Furthermore, they offer better heat insulation compared to other types of foundations.
There are generally two types of concrete slabs used in construction: monolithic slabs and stemmed slabs. Monolithic slabs are constructed all at once while stemmed slabs incorporate footings which help to distribute the weight of the structure more evenly across the ground. The choice between these two types largely depends on the building requirements and local climate conditions.
It’s important to note that pouring a slab is not just about laying down concrete but involves careful planning and preparation to ensure it serves its purpose effectively. This includes understanding the type of soil on your site, ensuring proper drainage, and incorporating reinforcements to enhance the strength and durability of your slab. Once you’ve grasped these basic concepts about what a slab is, you’re ready to learn more about how to pour a slab effectively and professionally.
Necessary Tools and Materials
Before diving into the process of how to pour a slab, it’s essential that you have all the necessary tools and materials at hand. A well-prepared workspace can prevent delays and complications during the process.
The first tool you will need is a shovel or a spade. This is used for digging out the area where the slab will be laid. Depending on the size of your project, you might also need a mini excavator or hire a company to excavate the area for you. It’s also worth mentioning that all pipelines or wiring running under your slab need to be identified and marked before beginning to dig.
Next, you’ll need wooden stakes and string in order to mark out the exact dimensions and shape of your concrete slab. This is crucial in ensuring your slab is poured correctly. You may also want to use a level to ensure that your formwork setup is perfectly horizontal.
Other essential tools include a wheelbarrow or a concrete mixer for mixing your cement, sand, aggregate, and water into concrete. It’s advisable to use a power mixer for larger projects as it saves time and energy compared to manual mixing.
A screed board, which can be a straight piece of lumber or metal, is used to level off the concrete after it has been poured onto the formwork. A float is then used after screeding to further smooth out the concrete surface.
For finishing touches, you will need an edging tool to round off the edges of your slab and give it a professional finish. If desired, you can also use a broom or brush to create non-slip surface texture.
As far as materials are concerned, you will obviously need concrete mix which generally consists of cement, sand (fine aggregate), and gravel (coarse aggregate). The proportions of these ingredients can vary depending on the strength and finish you want for your slab. You will also need water for mixing the concrete.
Additionally, you may require steel reinforcement bars or mesh to give your slab added strength and prevent cracking, especially if it’s going to bear heavy loads. Other materials like plastic sheeting (for preventing moisture seeping up into the slab) and wooden boards for formwork (to create a mold for your slab) will also be needed.
Remember, safety should never be compromised when pouring a slab. Always wear protective gear such as gloves, safety glasses, and sturdy boots. If using power tools, ensure they are in good working order and follow the manufacturer’s instructions carefully.
Safety Precautions
When it comes to construction projects such as how to pour a slab, it is essential to prioritize safety above all else. Working with concrete can be dangerous if the necessary precautions are not taken. Therefore, it’s crucial to follow these safety measures to prevent accidents and ensure a successful project.
Firstly, always wear the right protective clothing. Concrete contains chemical components that can cause skin irritation or burns. Therefore, you should wear long-sleeved shirts, long pants, sturdy work boots, and gloves. It would be best if you also had protective eyewear to shield your eyes from splashes of wet concrete or dust.
Secondly, before starting the work, always ensure to check your tools and equipment. Make sure they are in good working condition without any signs of damage or wear and tear. Damaged tools not only reduce efficiency but also pose significant safety risks.
Ensure that the work area is clear of any unnecessary objects or debris that may cause tripping hazards. The ground should be flat and stable; a shifting ground could cause uneven distribution of the concrete or even worse, lead to a fall hazard.
Another important factor is to be aware of the weather conditions on the day you plan on pouring the slab. Wet or stormy weather can make working with concrete more difficult and potentially unsafe. It’s best to choose a day with clear skies and moderate temperatures.
If you’re using power tools or machinery while pouring a slab, be sure you’re trained in how to use them safely. Misuse can lead to serious injuries. When using machinery like cement mixers, ensure they are securely grounded to avoid accidents due to tipping over or uncontrolled movements.
If you feel unwell or fatigued during the process, stop and rest. Physical strain can lead to mistakes, and in construction, mistakes can be dangerous.
In addition, if you’re working with others, maintain effective communication at all times. This can help avoid accidents caused by miscommunication or lack of coordination.
In summary, safety should never be compromised when learning how to pour a slab. By taking these precautions, you not only safeguard your well-being but also enable a more efficient and successful project outcome.
Site Preparation
The first step in understanding ‘How to pour a slab’ is mastering the art of site preparation. Paying attention and taking the time to properly prepare your site will impact the quality and durability of your finished slab. This is an essential process that should never be skipped or rushed.
Before you start, it’s important to note that proper site preparation involves more than just marking the area for the slab. It’s a multi-step process that ensures a level and stable base for your slab, helping avoid complications such as cracking or instability later on.
Start by clearing the area where you plan to pour the slab. Remove any grass, plants, rocks, or other debris from the area. Next, you need to ensure that the ground is level. This can be achieved by using a long level tool and adjusting the ground as needed. If there’s a slope in your intended location, you may need to build a temporary framework or retaining wall to support and contain the concrete.
Another crucial aspect of site preparation involves compacting the soil. Loose or uncompacted soil can lead to shifting and unevenness in your slab over time. Use a plate compactor or a hand tamp to solidify the ground surface thoroughly. If your soil is sandy or loamy, you might need to add gravel for better compaction and drainage.
The final step in site preparation is setting up form boards around the perimeter of your slab. These will act as boundaries for the concrete pour and help shape your slab. Form boards can be made from a variety of materials, but most commonly, wood (such as 2x4s) is used due to its accessibility and ease of use.
Making sure to secure these form boards tightly will prevent concrete from seeping out during the pouring process. Use wooden stakes on the outside of the form boards, driving them into the ground to keep everything in place. Once your form is secure and your site is properly prepared, you’re ready for the next step: mixing and pouring your concrete slab.
Remember, proper site preparation is the foundation of a successful slab pour. Skipping or rushing this process can lead to complications down the road. So take your time, be thorough, and prepare your site well for a durable and long-lasting concrete slab.
Setting the Forms
Now that we are familiar with the pre-requisites of pouring a slab, the next step in our guide ‘How to pour a slab’ is to ‘Set the Forms’. The formwork or forms refer to the temporary or permanent moulds into which concrete is poured until it self-supports and hardens. Accurate form setting is crucial because it determines the shape, level and size of your slab.
Firstly, it’s essential to determine the size of your concrete slab. Measure and mark the area where your slab will be poured with wooden stakes. Ensure the measurements correspond with the dimensions in your project plan. After marking, verify that the lines are straight using a builder’s line or laser level. This is important because once the concrete has been poured, making changes can be incredibly difficult and time consuming.
After marking out your slab boundaries, you can begin setting up your formwork. You’ll need to construct a box frame using form boards (usually made of wood or metal) around the marked area. Form boards should be fixed to the wooden stakes ensuring that they are secure and level. The top edge of these boards will create the height of your concrete slab.
The forms need to be sturdy enough to withstand pressure from wet concrete without bulging or collapsing. If you are pouring a larger slab, you might require additional support like cross braces within the formwork framework to provide stability.
Making sure your forms are leveled accurately is absolutely crucial in this process. Use a spirit level for this purpose. If the forms are not set level, then this will result in an uneven slab. Remember that any flaws in setting up forms will mirror onto your poured concrete slab as well.
Lastly, make sure to clean out any debris such as leaves, rocks or sticks from inside your forms prior to pouring in any concrete, as this could affect the smoothness and quality of your finished slab.
Setting the forms is a pivotal step in the process of how to pour a slab. It requires precision, patience and attention to detail. Nonetheless, once you’ve set up your forms correctly, you’re halfway through towards achieving a well-built and durable concrete slab.
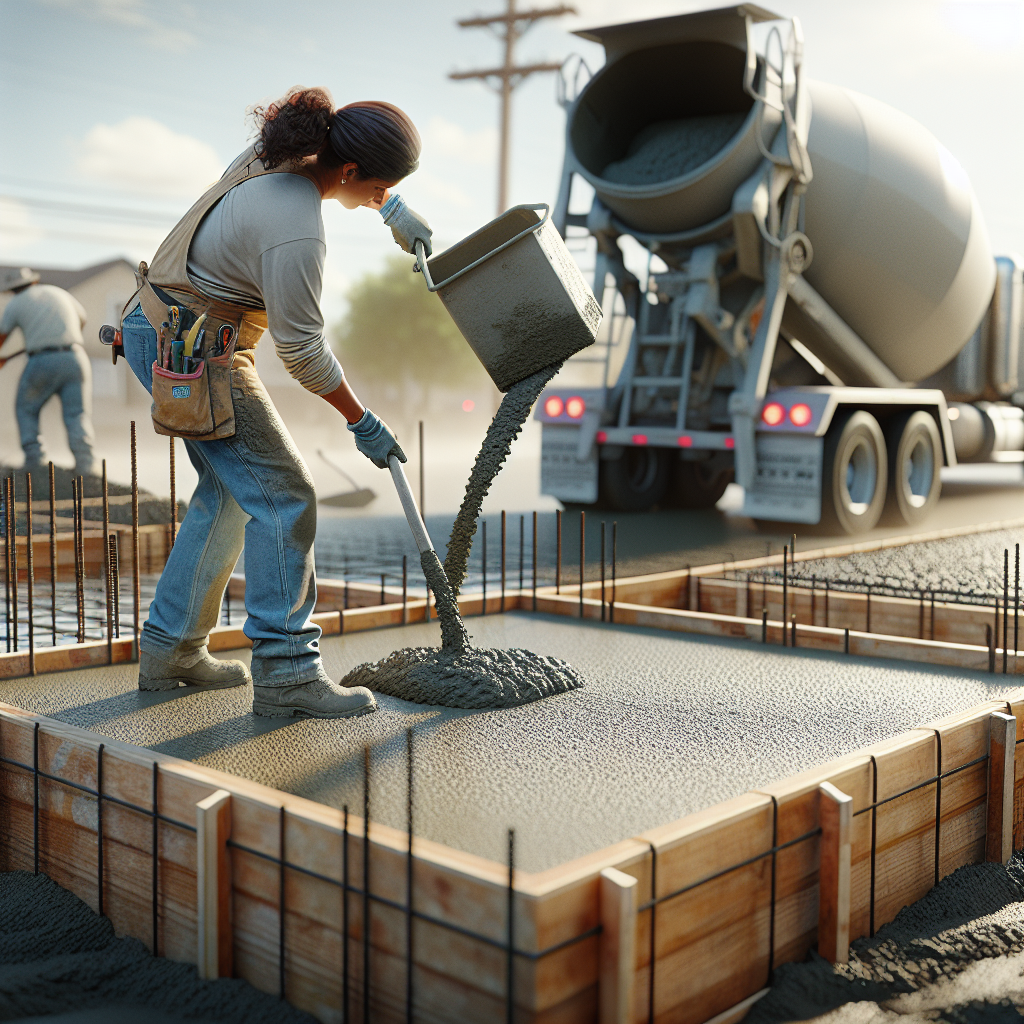
Mixing and Pouring the Concrete
Once you have prepared the ground and set up your forms, the next step in the ‘How to pour a slab’ process is the mixing and pouring of the concrete. This phase is critical, as it involves preparing the concrete mix and ensuring its proper distribution within the form. An ideal mix will result in a slab that is durable, strong, and long-lasting.
To begin with, you should choose a high-quality concrete mix designed for slabs or flatwork—these mixes typically contain sand, cement, coarse aggregate, and water. The precise proportions can vary depending on local conditions and requirements, but a common ratio is 1:2:3 (cement:sand:coarse aggregate). Always read the manufacturer’s instructions on the bag for the recommended amounts of each ingredient.
You can mix concrete manually in a wheelbarrow or mixer. Ensure that all ingredients are thoroughly combined until you achieve a uniform consistency—usually like that of thick peanut butter. The mix should be wet enough to be workable but not so wet that water separates from it. Remember, too much water weakens the concrete.
Before pouring the concrete into your slab form, dampen the area with water. This helps prevent moisture from being drawn out of the fresh concrete by dry ground—it allows the concrete to cure at an adequate rate. Remember to wear protective clothing, like gloves and safety glasses, when handling concrete.
Begin pouring at one end of your form and work your way across. Try to pour quickly so that each batch of fresh concrete blends with the old. If your slab area is large, consider using a wheelbarrow or bucket brigade system to speed up this process. You could also use a mechanical concrete mixer or hire a ready-mix truck if you have way too much ground to cover.
As you pour, use a rake or a shovel to spread the concrete. Ensure that it reaches into all corners and up against all edges of the form. Fill the form until the concrete is level with the top. After that, you can move on to screeding and floating, which will be discussed in the next section.
These steps on how to pour a slab require care and attention to detail. However, they are crucial in ensuring that your slab is sturdy, even, and long-lasting. Whether you’re creating a foundation for a building or laying a patio, understanding proper mixing and pouring techniques will help you achieve a high-quality result.
Smoothing the Surface
After you’ve successfully filled your form with a concrete mix, the next step in the process of ‘how to pour a slab’ involves an essential technique known as smoothing or finishing the surface. This is critical in ensuring that your slab is not only aestically pleasing but also highly functional and durable over time.
Initially, when you pour the concrete into the form, it won’t be perfectly smooth. It’ll probably have bumps, lines, and other inconsistencies. Before the concrete starts to harden, you need to smooth out these irregularities to ensure a level and even slab. This is where tools like screeds and floats become indispensable.
A screed, which can be a straight 2×4 board or a specialized aluminum tool, is used to level off the concrete. Move this tool across the surface in a sawing motion, adjusting as necessary to create an even surface. This process helps remove excess wet concrete and brings sand and cement closer to the surface. Make sure to work quickly as the concrete can start hardening within minutes depending on weather conditions.
After screeding, use a float to further smooth the surface. You can choose from several types of floats such as wood, resin or magnesium depending on your preference and the project requirements. Use broad sweeping motions with the float held at a slight angle for best results. The float also helps push down aggregate and bring moisture up to aid in smoothing.
If you want a very smooth finish or if your slab will be visible like a driveway or patio, you may want to use a steel trowel after floating. Troweling should only be done when water sheen has left the surface and it has started to harden slightly.
Remember that while it’s important to get a smooth finish, overworking can weaken the surface and cause problems later on such as cracking or flaking. So, ensure you strike a balance between achieving smoothness and maintaining the slab’s strength.
Smoothing or finishing the surface of your slab is crucial in the overall quality and longevity of your slab. It not only improves its appearance but also enhances its ability to resist weathering and wear. Now that you know how to pour a slab and smooth its surface, you can confidently embark on your concrete project.
Curing the Slab
After successfully pouring your concrete slab, the next crucial step is ‘curing the slab’. This is an indispensable step on ‘how to pour a slab’, and it requires due diligence and patience. While it may seem like the hard work is done once you’ve poured the concrete, the truth is that curing the slab is equally essential to ensure that the finished product is strong and durable.
Curing is essentially the process of keeping the freshly poured concrete damp so that it can hydrate without losing too much water. Water plays a vital role in chemically bonding the components of concrete, which gives it strength. If too much water evaporates from your slab too quickly, this can weaken your concrete, leading to cracks and other structural issues in the long run.
A simple way to cure a slab is to continuously wet it with water for at least seven days. You can do this by setting up a sprinkler or manually spraying water onto it multiple times a day. Alternatively, you can cover the slab with plastic sheeting or special concrete curing blankets. These methods help retain moisture in the concrete but also protect it from rain, sun, or drastic temperature changes which could adversely affect its curing process.
Another method used for curing involves applying curing compounds onto the slab. These are special chemicals that form a membrane on the surface of the concrete to seal in moisture. They are generally sprayed onto the concrete after it has hardened slightly but while it’s still wet. Using curing compounds can be a time-saving option, especially for large slabs.
The duration of curing depends primarily on weather conditions and the specific requirements of your project. However, as a general rule of thumb, most slabs need to be cured for at least 28 days at temperatures above 50°F. This ensures that about 95% of the desired strength is achieved.
It’s important to note that curing doesn’t speed up the hardening process but rather ensures it takes place correctly. Rushing this stage can result in a weak slab that won’t last very long, so patience is key here.
Curing may seem like a long and tedious process, but it’s essential when learning how to pour a slab. It ensures that your structure will be durable and able to withstand the test of time, making it worth every effort. Remember, the goal is not just to pour a concrete slab but to pour a high-quality and durable one.
Tips for a Better Slab Pouring
When it comes to the construction process, one of the most crucial steps is learning how to pour a slab. A concrete slab serves as a foundation for structures like homes, garages, and sheds. If done correctly, it can provide solid support for many years. However, if mishandled, it can lead to cracking or settling that can compromise the structure’s stability. Here are some tips to ensure you pour a better slab.
1. Proper Planning: Before you start pouring the slab, make sure you have a clear plan of where and how it will be placed. This includes understanding the terrain and soil type where you’ll be working and planning for drainage and slope. Sketching out a detailed plan will help prevent mistakes during the pouring process.
2. Correct Site Preparation: The site where the slab will be poured needs to be well-prepared. This involves clearing away debris, leveling the ground, compacting the soil, and setting up forms correctly. Spending an ample amount of time on site preparation can make a significant difference in the final product.
3. Use High-Quality Materials: It’s essential to use high-quality concrete mix and reinforcement materials for your slab. The strength and durability of your slab depend significantly on the quality of materials used.
4. Proper Mixing and Pouring: The concrete mix should be appropriately mixed to achieve the right consistency—it shouldn’t be too wet or too dry. An incorrect mix can lead to weak slabs that are prone to cracking. Pouring should also be done gradually and evenly to avoid air pockets or uneven thickness.
5. Reinforce Your Slab: Depending on the size and load-bearing requirements of your slab, you may need to reinforce it with rebar or wire mesh. These materials help to strengthen the slab and prevent cracks.
6. Proper Curing: After the slab is poured, it needs to cure properly. This generally involves keeping the concrete moist and protected for several days to allow it to harden and gain strength. Skipping or rushing this step can lead to a weak slab that may crack over time.
In conclusion, learning how to pour a slab is not just about mixing cement and water and spreading it on the ground. It requires careful planning, proper materials, good workmanship, and adequate curing time. Following these steps will ensure your slab is strong, durable, and long-lasting.
Common Mistakes to Avoid
When it comes to the process of pouring a slab, there are a few common mistakes that beginners as well as experienced individuals can make. Here we will discuss these errors, so you can better understand ‘how to pour a slab’ correctly and professionally.
Incorrect Ground Preparation: One of the most common errors is inadequate ground preparation. This process involves compacting the soil, leveling the area, and laying a sub-base if necessary. Failure to properly prepare the ground can lead to uneven slabs, sinking, or even cracking in the future.
Wrong Mix Ratio: Another typical mistake is not getting the concrete mix ratio right. It’s vital to use appropriate amounts of cement, aggregates, and water for the mix. Too much of any component can affect the strength and durability of your slab. A good rule of thumb is to follow the manufacturer’s instructions for mixing ratios.
Poor Weather Planning: Pouring concrete on a rainy day or when it’s too hot or cold can cause issues. If it’s too wet, then the water may dilute your mix, affecting its strength. If it’s too hot or cold, it can cause premature curing or freezing respectively. So plan your project carefully considering weather conditions.
Rushing The Curing Process: It can be tempting to rush through curing, especially with smaller projects or when under time constraints. However, an adequately cured concrete slab is much more durable and resistant to cracking. Ideally, concrete should be allowed to cure for at least one week before subjecting it to loads.
Overlooking Concrete Slab Reinforcement: Depending on where you’re laying the slab and what kind of load it’ll bear, it might need reinforcing steel bars (rebars) or wire mesh. Overlooking this step can lead to a weaker slab that might crack under pressure.
Inadequate Formwork: Formwork should be sturdy and well-braced to hold the weight of the concrete. Weak formwork may give way, resulting in an uneven or misshapen slab. Additionally, not properly sealing your formwork can allow moisture to seep out from the bottom, which can affect the overall strength of your slab.
By avoiding these common mistakes when learning how to pour a slab, you can ensure a stronger, more durable and long-lasting result. Concrete work isn’t always forgiving, but with proper planning and attention to detail, you’ll get it right.
Conclusion
In conclusion, the process of how to pour a slab is a task that entails careful planning, preparation, and execution. It is not simply about pouring concrete onto a surface but involves several steps from digging the ground, setting up the forms, installing wire mesh or rebar for reinforcement, to ultimately pouring the concrete and finishing it smoothly. This guide aims to provide detailed instruction and advice to assist you in successfully accomplishing this DIY project.
While the process might seem intimidating or complex at first glance, with the right tools, materials, and a step-by-step guide at your disposal, you will find that learning how to pour a slab is not an insurmountable challenge. It can be a rewarding experience that allows you to enhance your craftsmanship skills and add value to your property.
However, it’s crucial to remember that each stage of the process holds its own level of importance. Neglecting or rushing through one phase can potentially jeopardize the quality and longevity of your slab. Hence, patience and attention to detail are key in achieving a durable and well-crafted concrete slab.
Acknowledge that while doing it yourself can save on labor costs, it doesn’t diminish the need for skilled workmanship. If at any point you feel unsure about a certain step or lack the necessary equipment, don’t hesitate to call in professional help. The goal should always be to ensure your safety and deliver a high-quality finish – both of which are achievable with proper knowledge, preparation, and execution.
In summary, learning how to pour a slab is a practical skill that can be mastered with time and effort. Whether it’s for creating a patio space in your backyard or laying down the foundation for your shed or garage, knowing how to pour a concrete slab proficiently can prove highly beneficial. So get ready with your tools and protective gear; meticulously follow each step outlined in this guide, and soon, you’ll be able to successfully pour a concrete slab that stands the test of time.