Introduction to Concrete Pavers
Concrete pavers, also known as paving stones or simply pavers, are a popular choice for homeowners and business owners who want to add a touch of elegance and style to their outdoor spaces. They are used in a variety of applications such as patios, driveways, gardens, and walkways. This blog post aims to provide you with an introduction to concrete pavers and guide you through the process of ‘How to concrete pavers.’
Concrete pavers have gained popularity over the years due to their durability, versatility, and aesthetic appeal. Made from cement and aggregate, these pavers are designed to withstand heavy traffic and extreme weather conditions. They can be made in a variety of shapes, sizes, textures, and colors to match any design aesthetic.
One of the main benefits of using concrete pavers is their flexibility. Unlike poured concrete or asphalt which are prone to cracking under pressure or from changes in temperature, pavers are designed to flex with the ground beneath them. This flexibility helps prevent cracking and ensures that your installation lasts for many years.
Another major advantage is that they are low maintenance. If a paver needs replacing due to damage or staining, you can simply remove the affected stone and replace it with a new one. This is much more cost-effective than having to repair or replace an entire slab of concrete or asphalt.
When it comes to how to concrete pavers, the process involves several steps including preparing the site, setting out the area for paving, laying the paver base material, placing the pavers in your chosen pattern, cutting the pavers to fit perfectly at the edges if necessary, filling joints with sand and finally sealing the surface.
In terms of cost-effectiveness, concrete pavers can be more expensive upfront compared to other materials like asphalt or poured concrete. However, considering their durability, low maintenance, and aesthetic appeal, they can be a more cost-effective option in the long run.
This post will delve deeper into how to concrete pavers, providing you with detailed information and practical tips to help you create beautiful, durable, and functional outdoor spaces using this versatile material. Whether you are a seasoned pro or a DIY enthusiast exploring new projects, this guide will equip you with the necessary knowledge and skills.
Tools and Materials Required
In order to successfully accomplish the task of ‘how to concrete pavers’, it’s essential to prepare all necessary tools and materials in advance. Here, we compile a list of everything required to ensure a smooth process with excellent results.
Materials:
- Concrete Mix: The most important material is the concrete mix. Opt for a ready-made bagged concrete mix available at home improvement stores, which only needs water added.
- Pavers: Pavers are available in different shapes, sizes, and designs. Choose those that suit your preference and the style of your outdoor space.
- Sand: Sand is used as a base for the pavers and helps level the ground before laying the pavers.
- Gravel: Similarly to sand, gravel provides a solid foundation for your pavers. It also aids in drainage.
- Jointing Compound: A jointing compound or polymeric sand is used to fill gaps between the pavers after they’ve been laid and concreted into place. It helps keep the pavers stable and prevents weed growth between them.
Tools:
- Wheelbarrow: A wheelbarrow is essential for mixing concrete and transporting materials around your work area.
- Tape Measure and Markers: Use these tools to accurately measure the area where you’re going to lay the concrete pavers and mark out straight lines for precision.
- Digging Tools: Spades or shovels are needed for digging out the area where you’ll lay your pavers.
- Spirit Level: Spirit levels are crucial to ensure your pavers are laid evenly.
- Rubber Mallet: This tool is used to tap the pavers into place, ensuring they are firmly embedded in the concrete mix.
- Broom: A broom is needed for sweeping the jointing compound into the gaps between the pavers.
- Protective Gear: Always remember to protect yourself when dealing with heavy materials and tools. This includes work gloves, safety glasses, and sturdy boots.
Learning ‘how to concrete pavers’ requires time and patience, but having all of the correct tools and materials on hand will make the process easier and more efficient. Remember, accurate measurements and leveling are key to achieving professional-looking results.
Safety Measures
As with any DIY project or construction task, safety should always be a paramount concern. This is no different when figuring out how to concrete pavers. No matter what type of project you are undertaking, it is essential that you make sure to take the necessary precautions to prevent any potential accidents or injuries.
The first step in ensuring your safety is to use the proper personal protective equipment (PPE). When working with concrete, this includes safety glasses, gloves, and sturdy footwear. The glasses will protect your eyes from any flying debris or dust created when mixing or laying the concrete. Gloves are essential for protecting your hands from the harsh chemicals in concrete that can cause skin irritation or burns. Sturdy footwear is necessary because it provides traction on slippery surfaces and protects your feet from falling objects.
In addition to PPE, other safety measures should be considered as well. If you’re dealing with heavy materials or tools, ensure that they are handled properly and safely. Do not attempt to lift anything that is too heavy for you; instead, get help or use mechanical aids such as wheelbarrows or hand trucks. Also, remember to lift with your knees and not your back to avoid strain.
Another important safety factor is ventilation. When mixing concrete, you should do it outside or in a well-ventilated area to avoid inhaling potentially harmful dust. If you must work in an enclosed space, use a respirator mask.
Additionally, be aware of the risks associated with using power tools. Always follow the manufacturer’s instructions and ensure that you have a clear understanding of how each tool works before using it. Keep all power cords away from water and clear of any walking paths to prevent tripping hazards.
Lastly, it’s important to take breaks and stay hydrated when working with concrete. It can be a physically demanding task, and taking short breaks can help prevent exhaustion and overheating.
Understanding how to concrete pavers safely is as important as understanding the process itself. The safety measures mentioned here will not only protect you, but they will also ensure a successful and efficient project execution. Be safe and enjoy your DIY project!
Preparing the Ground
Before you start laying out your concrete pavers, one of the most crucial steps is preparing the ground. ‘How to concrete pavers’ is a question we often get, and the answer always begins with effective ground preparation. This step ensures a solid foundation, prevents shifting over time, and contributes to the overall aesthetics and longevity of your patio or walkway.
Firstly, you should start by defining the area where you plan to lay the pavers. This can be done using stakes and string for straight edges or a garden hose for curved designs. Once you’ve outlined your desired space, it’s time to clear the site. Remove any grass, plants, roots or debris from the area. Depending on your region and soil type, you may also need to excavate some of the existing soil to ensure a stable base for your pavers.
The recommended depth to dig should usually account for the thickness of your paver, plus an additional 6 inches for a gravel base and an inch for a layer of sand. For example, if you are using 2-inch-thick pavers, you would need to excavate about 9 inches deep – 2 inches for the paver, 6 inches for gravel and an inch for sand.
Next, it’s time to create a firm foundation. Start by laying and compacting a sub-base of gravel. This provides stability and helps with drainage. Rake it level before compacting it with a plate compactor or hand tamper so that it’s flat and firm. Your aim should be to create a level, unyielding base that does not hold water.
Following this step is laying down a layer of coarse sand. The sand layer must be even as well because uneven sand leads to uneven pavers which can lead to tripping hazards or pooling water.
Finally, before you place your pavers, install edge restraints to prevent lateral movement. These restraints can be made of plastic, precast concrete or metal. They are of utmost importance as they keep the shape of your project over the years.
Preparing the ground properly is a labor-intensive but vital part of how to concrete pavers correctly. When done right, it will ensure that your pavers lay flat and stay in place for years to come, providing you with a durable and attractive surface.
Setting Up the Form
Before proceeding with ‘How to concrete pavers’, it’s imperative to have a well-defined structure or form in place. This form will guide the configuration of your pavers, ensuring that they fit perfectly into the predetermined pattern and maintain a uniform appearance. Setting up the form is therefore a crucial step in creating concrete pavers that are robust, durable, and aesthetically pleasing.
To begin with, you’ll need to measure the area where you intend to install your pavers. This will determine the size of your form. Keep in mind that larger forms are more challenging to manage but permit you to create more pavers at a time. On the other hand, smaller forms are easier to handle but take more time as you can only make fewer pavers per batch.
There are various materials you can use for your form such as wood or metal. However, melamine-coated particleboard is often recommended due to its smooth surface which allows easy removal of the concrete paver once it’s dry.
Create a bottomless box using your chosen material, ensuring that the length and width match the size of your proposed paver. The height of your form should also correspond with the thickness of your desired paver. For instance, if you’re aiming for 2-inch thick pavers, your form’s height should also be 2 inches.
Use screws to fasten the corners of your form together for stability. It’s also wise to apply a thin layer of oil on the insides of your form which aids in removing the dried concrete later on. Always remember to ensure all corners and edges are square and straight; this will help in achieving uniformity among all your concrete pavers.
Finally, for those wondering how to concrete pavers without a mess, consider placing your form on a flat, smooth surface such as a large piece of plywood or a concrete slab. This not only creates a clean work area but also gives your pavers a smooth bottom surface.
In conclusion, setting up the form is an essential step in how to concrete pavers. It sets the groundwork for your project and dictates the size and shape of your pavers. So ensure that you spend adequate time in this phase to make sure your project turns out just as you envisioned.
Mixing and Pouring the Concrete
Once you’ve completed the preparation phase, the next step in ‘How to concrete pavers’ is mixing and pouring the concrete. This process will require your full attention, as attempting to rush it could lead to poor results. Before starting, ensure you have all necessary materials and tools within reach. These include a wheelbarrow or large bucket for mixing, a shovel or trowel for mixing and spreading, and of course, your cement mix.
Begin by pouring your bag of dry cement mix into your mixing vessel. The quantity of cement needed will depend on the size and number of pavers you’re making. Next, gradually add water according to the manufacturer’s instructions on the bag of cement mix. It’s crucial that you don’t add too much water at once, as this can result in a watery mixture that won’t set properly. Instead, add just enough water to create a consistency similar to peanut butter. Use your shovel or trowel to mix thoroughly until no dry patches remain.
Once you’ve achieved the correct consistency, you’re ready to pour the concrete into your paver moulds. Carefully scoop or pour the mixture into each mould, ensuring that it reaches all corners. Shake and tap each mould gently to remove any air bubbles and ensure an even distribution of the concrete. If creating patterned or intricate designs, use a trowel or similar tool to push the mixture into all areas of the mould.
After filling your moulds, use a straight edge (like a piece of wood or metal) to screed across the top of each one. This will help you achieve a smooth, level surface on each paver. Once you’re done with this step, leave your pavers undisturbed for at least 24 hours (or as indicated by the cement manufacturer) to set.
Remember, the key to successfully mixing and pouring concrete for pavers is patience. Take your time to ensure that the mix is just right and that it’s evenly distributed in your moulds. By following these steps methodically, you’ll be well on your way to creating beautiful, durable concrete pavers for your outdoor space.
Smoothing the Concrete Surface
Once you’ve poured and shaped your concrete pavers, an important step in the process is smoothing the concrete surface. This is an essential part of ‘how to concrete pavers’ and will ensure that your project has a professional, finished appearance.
The process of smoothing concrete is also known as “finishing,” and it’s a task that requires a little bit of skill and patience. However, with the right tools and techniques, it’s something that even beginners can effectively carry out.
When your concrete is still wet and pliable, you want to start by spreading it out evenly with a hand trowel or a straightedge screed. This helps to level out any rough spots or peaks in the mix. The next step is to use a bull float – a large flat tool connected to a handle – to go over the surface while applying slight pressure. This pushes down the aggregate and brings the fine particles to the surface, creating a smooth finish.
After floating, you’ll notice water called ‘bleed water’ surfacing on your slab. It’s important to let this water evaporate completely before proceeding further. If this step is rushed, it can result in a weak and unsightly finish that may crack over time. Patience during this step is key: depending on weather conditions, this could take anywhere from 15 minutes to several hours.
The final step in smoothing your concrete pavers involves ‘edging’ and ‘grooving.’ Edging involves running an edging tool around the perimeters where the concrete meets your forms or existing structures. This creates clean edges that are not prone to chipping or cracking. Grooving, on the other hand, means cutting grooves into the concrete surface at specific intervals to prevent cracking due to temperature changes or shrinkage over time.
Remember, how well you smooth and finish your concrete pavers can significantly impact the final look and longevity of your project, so it’s worth taking the time to learn and master these skills. It’s all part of understanding ‘how to concrete pavers.’
Lastly, ensure that you clean all your tools promptly after use. Concrete can harden quickly, making it difficult to remove later on.
With these steps, you can achieve smooth, professional-looking concrete pavers that will serve you well for many years.
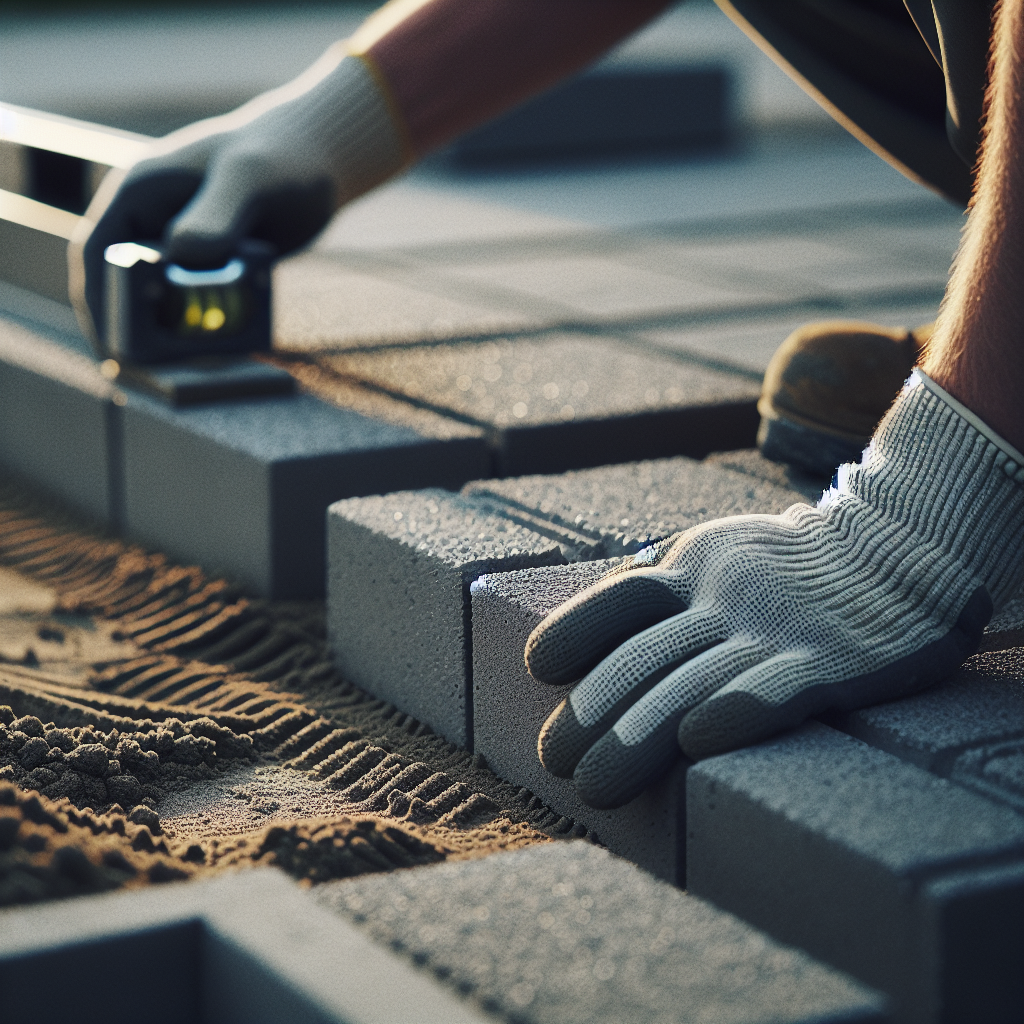
Cutting and Laying the Pavers
The next significant step in the process of ‘How to concrete pavers’ is cutting and laying the pavers. This stage is crucial as it determines the overall appearance and smoothness of your paved area. Here are some key steps and tips to guide you through.
Step 1: Marking the Pavers
Measure the area where your pavers will be laid carefully and mark where you’ll need to cut your pavers accordingly. A regular pencil can work perfectly for this task. Remember, it’s always better to measure multiple times to avoid errors.
Step 2: Cutting the Pavers
For cutting the pavers, a concrete saw or a wet saw can be used, both of which are readily available at local tool rental centers. Don’t forget to put on your safety gear – including goggles, gloves, and dust masks. Using these tools require precision and patience as hasty movements can lead you to break a paver or even cause injury.
Step 3: Laying the Pavers
Once all the pavers are cut as per your marking, it’s time to lay them down in your prearranged pattern. Start from one corner and work your way towards the other end. It’s recommended to lay a bed of sand before placing the paver, ensuring their stability and levelness. Use a rubber mallet to tap them gently into place.
Step 4: Checking for Levelness
Checking for levelness is an important step that should not be overlooked. Use a spirit level to check each laid paver. In case any paver is uneven, lift it up, add or remove some sand underneath it, and lay it back down. Continue adjusting until the right level is achieved.
While the process of ‘How to concrete pavers’ may seem daunting at first, with the right tools and guidance, it can be a fulfilling DIY project. This guide on cutting and laying pavers will surely assist you in creating a beautiful paving area that will stand up to traffic and weather conditions while also enhancing the aesthetic appeal of your outdoor space.
Curing the Concrete Pavers
Once you’ve successfully installed your concrete pavers, the next crucial step is ‘Curing the Concrete Pavers.’ If you’re wondering How to concrete pavers and ensure they last long, then curing is a process you shouldn’t skip. Curing plays a significant role in guaranteeing the durability, strength, and excellent performance of your concrete pavers.
Curing refers to maintaining adequate moisture and a favorable temperature in newly laid concrete to promote its hydration. This might sound technical, but it’s a simple process that ensures that your concrete reaches its maximum potential in terms of strength and durability.
The curing process begins as soon as the concrete has been laid and smoothed out. The top layer of the concrete starts to dry out and harden. It’s essential to prevent too much water from evaporating during this initial phase. You can do this by covering the surface with a plastic sheet or by using a chemical curing compound. These methods create a barrier that slows down the evaporation rate.
If proper curing doesn’t occur, the concrete will not reach its potential hardness and could end up being brittle and prone to cracking. A well-cured concrete paver will have a much longer lifespan and will be more resistant to wear and tear, making it an investment worth protecting.
The duration of the curing process can vary based on several factors including the specific type of cement used, mixture proportions, required strength, size and shape of concrete, weather conditions, future exposure conditions etc. But generally, it’s recommended that curing be done for 7 to 14 days after the concrete has been laid.
During this time, it’s important not to place any heavy items on the surface or use the area excessively. This allows the concrete ample time to cure without being disturbed.
In conclusion, understanding how to concrete pavers isn’t enough without a proper grasp of the curing process. Curing is not a stage to overlook or rush; instead, it’s an important investment of time that reaps benefits in the long-term durability and quality of your concrete pavers.
So, once you’ve laid those pavers carefully and beautifully, make sure you give them the time and attention they need to cure properly. This will ensure that your concrete pavers are as durable, resilient, and long-lasting as possible.
Finishing Touches
After you’ve successfully laid out your concrete pavers, it’s time for the essential last step in your ‘how to concrete pavers’ journey – the finishing touches. This last step is often overlooked, but it’s incredibly important to ensure the longevity and aesthetic appeal of your new walkway or patio.
Firstly, make sure that all the pavers are at the right level. Use a long straight edge or level to check this. It’s crucial because it helps prevent water from pooling on your finished surface and ensures a flat walking area which can prevent trips and falls.
Once you’ve checked and ensured all pavers are level, it’s time to fill in the gaps between them. Depending upon the type of aesthetic you are trying to achieve with your project, different materials can be used – sand, fine gravel or even cement mortar if you prefer a more polished look. This not only adds to its visual appeal but also keeps the pavers locked in place, making your pavement more stable.
Filling the gaps with sand is usually the most straightforward method. Just spread some fine sand over the area and sweep it into the cracks using a stiff broom. Another way is to use a vibratory plate compactor with a rubber pad attached to compact the sand into the joints. It will create a tight fit and lock pavers into place.
You may also opt for polymeric sand, which is activated by water and hardens up once dried. It’s excellent for preventing weed growth between pavers and stops ants from burrowing between them. However, applying polymeric sand requires careful attention as any leftover residue on top of the pavers can leave a permanent haze once activated.
Finally, consider sealing your paver surface with a good quality concrete sealer after about six months. The sealer will help prevent stains, enhance color, and inhibit weed growth and insect activity. Sealing is an optional step but can extend the life of your pavers and maintain that newly-laid look for longer.
The process of ‘how to concrete pavers’ can be a fun DIY project that adds value and beauty to your home. By carefully laying the pavers, filling in the gaps properly, and adding any other finishing touches you prefer, you can easily create a beautiful and durable walkway, patio or driveway that will serve you well for years to come.
Maintenance Tips for Concrete Pavers
Concrete pavers are an integral part of many homes and landscapes, acting as a durable and aesthetically pleasing option for driveways, walkways, and patios. However, like any other material, they do require regular maintenance to stay in top condition. In this section, we will offer some maintenance tips to help you keep your concrete pavers looking their best.
1. Regular Cleaning: One of the simplest ways to maintain your concrete pavers is by regularly sweeping or hosing them down. This helps prevent the accumulation of dirt, leaves, and other debris that can stain or damage the pavers over time.
2. Stain Removal: If you notice stains on your pavers, it’s crucial to address them promptly. Most stains can be removed using a mixture of warm water and mild detergent. For stubborn stains like oil or paint, you may need a specialized cleaning product. Always remember to test any new cleaning products on a small area first to ensure they won’t discolor or damage the pavers.
3. Weed Control: Weeds growing between your pavers not only detract from the appearance but can also cause structural issues over time. Therefore, it’s important to pull out any weeds as soon as they appear. Using a good-quality weed killer can also help keep these pesky plants at bay.
4. Sealing: Sealing concrete pavers enhances their color and helps protect them from wear and tear. It also prevents water absorption which can lead to cracking in freezing temperatures. Pavers should be sealed every 3-5 years for optimal protection.
5. Paver Replacement: Despite our best efforts, sometimes a paver may crack or become otherwise damaged. When this happens, it’s important to replace it promptly to prevent further damage. This can often be a simple DIY job if you have spare pavers and some basic tools, but don’t hesitate to hire a professional if needed. Learning ‘how to concrete pavers’ can save you both time and money in the long run.
In conclusion, maintaining your concrete pavers requires regular cleaning, prompt stain and weed removal, periodic sealing, and timely replacement of damaged pavers. By following these simple steps, you can ensure your pavers continue to enhance the beauty of your home for many years to come.
Conclusion
After a thorough examination of the step-by-step process on ‘how to concrete pavers’, it’s evident that this is a task that requires careful planning and precision. Though it may seem challenging at first, with the right tools and guidance, anyone can transform their garden or driveway.
Concrete pavers are a practical choice for many homeowners due to their durability and flexibility in design. They can withstand various weather conditions and heavy loads while providing an aesthetic appeal to your outdoor spaces. They offer a multitude of design options, enabling you to create unique patterns that reflect your style. Although the process is labour-intensive, the satisfaction of crafting your own paving stones is certainly worth the effort.
Remember, laying concrete pavers isn’t just about the physical task. It’s also about understanding the importance of each step in the process – from creating a solid base to ensure longevity, through choosing the right pattern that suits your space, to the need for accurate measurements and cuts for a seamless fit. And let’s not forget about the essential finishing touch – sealing. Sealing not only enhances the color but also helps to protect pavers from stains and weather damage, keeping them looking great for years.
As with any DIY project, safety is paramount. Always wear suitable protective clothing, including gloves, safety glasses and sturdy boots when working with concrete. If you’re unsure about any aspect of how to concrete pavers, seek professional advice before commencing.
In conclusion, ‘how to concrete pavers’ is an achievable DIY project that can enhance your property’s value and appeal. It allows homeowners to bring a personal touch to their outdoor spaces while enjoying the sense of accomplishment that comes with completing a home improvement project. Concrete pavers offer durability combined with versatility in design – making them an excellent choice for those seeking a balance between functionality and aesthetics.
So, are you ready to take on the challenge? Whether you’re looking to create a pathway, a patio or a driveway, your project starts with understanding how to concrete pavers. With patience, precision and the right tools, you can pave your way to a beautiful and functional outdoor space.