Introduction
Building your own home or simply improving the exterior of an existing property involves many tasks, one of which might be creating a drivable path. One question that commonly crops up in this context is, ‘How do I make a gravel driveway?‘. A gravel driveway not only enhances the aesthetic appeal of your home but also provides a robust and cost-effective solution for a place to park and drive your vehicles.
Gravel driveways are becoming increasingly popular across the globe due to their easy installation process, minimal maintenance requirement, and budget-friendly nature. They offer great permeability for rainfall, making them an eco-friendly choice compared to alternatives like concrete or asphalt. Furthermore, they add a rustic charm to your property that’s difficult to achieve with other materials.
In this blog post, we will guide you through the step-by-step process of installing your very own gravel driveway. From planning and measuring the area to laying down the gravel, we will provide comprehensive instructions to ensure your project is successful. Whether you’re a seasoned DIYer or a novice in home improvement projects, our guidelines will be easy to follow. The satisfaction you get from building and seeing your own gravel driveway is definitely worth the effort!
Remember, building a gravel driveway isn’t just about pouring some stones into a path; it requires careful planning, preparation, and execution for it to be sturdy and long-lasting. By the end of this post, you’ll have acquired the knowledge on how to properly lay a stable base layer, what kind of gravel to choose, how much you’ll need, how to spread it evenly, and how to maintain it over time.
Join us as we delve into ‘How do I make a gravel driveway?’ Your journey towards constructing an efficient, durable and appealing driveway begins here.
Materials Needed
To answer the question, ‘How do I make a gravel driveway?’, it’s important to familiarize yourself with the essential materials needed for undertaking such a project. A well-made gravel driveway can not only improve the aesthetic appeal of your property but also provide a robust and long-lasting drive path.
The first and most crucial material you’ll need is gravel. There are numerous types of gravel available, each with its own unique aesthetic and functional characteristics. Common options include pea gravel, crushed stone, and quarry process stone. The quantity necessary will depend on the size of your driveway, but a good rule of thumb is to calculate at least 100 square feet per ton of gravel.
You will also need a geotextile fabric. This special fabric serves as a barrier between the ground soil and the gravel, preventing weed growth and sinking due to soil movement. It also aids in drainage by allowing water to seep through while keeping the soil intact.
The third materials are landscaping stakes and string, utilized for marking out the area where your gravel driveway will go. These tools are vital in ensuring that your driveway has straight edges and maintains a consistent width throughout its length.
Wooden planks or railroad ties are sometimes used as edging to keep the gravel from spilling out onto the surrounding landscape. This is optional and dependent on personal preference.
The next set of materials consists of equipment for compacting and distributing the gravel – a shovel, a rake, and a tamper or roller. A shovel is necessary for moving the gravel around while a rake helps in spreading it evenly across the driveway surface. A tamper or roller is used to compact the gravel, making it a firm surface to drive on.
You will also require drainage pipes or culverts, especially if your driveway has a slope. These systems help direct water away from your driveway, preventing erosion and other potential damage.
Lastly, consider having a dust suppressant on hand. Dust can be a significant problem with gravel driveways, especially during dry seasons. A dust suppressant like calcium chloride can help keep the dust down and make your driveway more comfortable to use.
In conclusion, planning ahead and ensuring you have all necessary materials on hand will make the process of creating your own gravel driveway much smoother and most likely more successful. ‘How do I make a gravel driveway?’ – With these materials listed and some effort, you’ve already taken the first big step towards answering that question.
Choosing the Right Gravel
One of the most important considerations when asking yourself ‘How do I make a gravel driveway?’ is the type of gravel you choose. The gravel you pick will not only determine how your driveway looks, but also its durability and maintenance needs.
The first choice to make is between crushed stone and pea gravel. Crushed stone is a more common choice for driveways, as it offers a lot of variety in appearance and is highly durable. It’s composed of different types of stone, all broken down into consistent sizes, making it ideal for creating a stable surface that can withstand heavy weight. However, this kind of gravel may be hard on bare feet and can make snow removal a bit difficult.
On the other hand, pea gravel has a smoother texture and rounder shape that’s easy on bare feet. It also presents an array of natural colours that can add an attractive visual appeal to your driveway. However, due to its rounded shape, it doesn’t provide the same stability as crushed stone and may shift under weight.
The size of the gravel pieces also matters. While large pieces can provide a solid base, they may be uncomfortable to walk on and more difficult to spread evenly. Smaller pieces are easier to work with and create a smoother surface but might not provide the same level of stability as larger pieces.
In terms of colour, you have options ranging from white and gray to red or mixed colours. While this choice largely depends on your personal preference and the overall look of your home, keep in mind that darker colours retain more heat from the sun, which can help melt snow faster during winter.
Lastly, consider the local climate when choosing gravel. If you live in a place with lots of rain or snow, opt for gravel types and sizes that do not erode away easily or become overly muddy. In contrast, if you live in a hot and dry area, choose gravel that retains moisture to keep dust down.
‘How do I make a gravel driveway?’ is a question that starts with the selection of the right gravel. By considering your needs and preferences in terms of durability, appearance, size, colour, and weather resistance, you can create a driveway that is not only functional but also complements your home’s exterior.
Preparing the Driveway Base
The key element of creating a long-lasting gravel driveway is constructing a strong and reliable base. So, you may ask, “How do I make a gravel driveway with a firm foundation?” Here are the steps to ensure your driveway will withstand the test of time.
First, you’ll need to remove any grass, dirt or debris from the area where you’ll be laying your driveway. This can typically be achieved using a shovel or a sod cutter for larger areas. Try to dig at least 10-12 inches deep to create room for all the necessary layers. The removal of debris is crucial to prevent any organic material from decomposing under your driveway and causing it to sink or become uneven over time.
Once you’ve cleared the space, it’s time to level and compact the ground. Using a builder’s level, check for any high or low spots in the area. Fill in low areas with additional dirt and tamp down high areas until everything is even. After leveling, compact the soil using a plate compactor. Compaction is vital as it provides a solid base for your gravel driveway and prevents sagging or sinking.
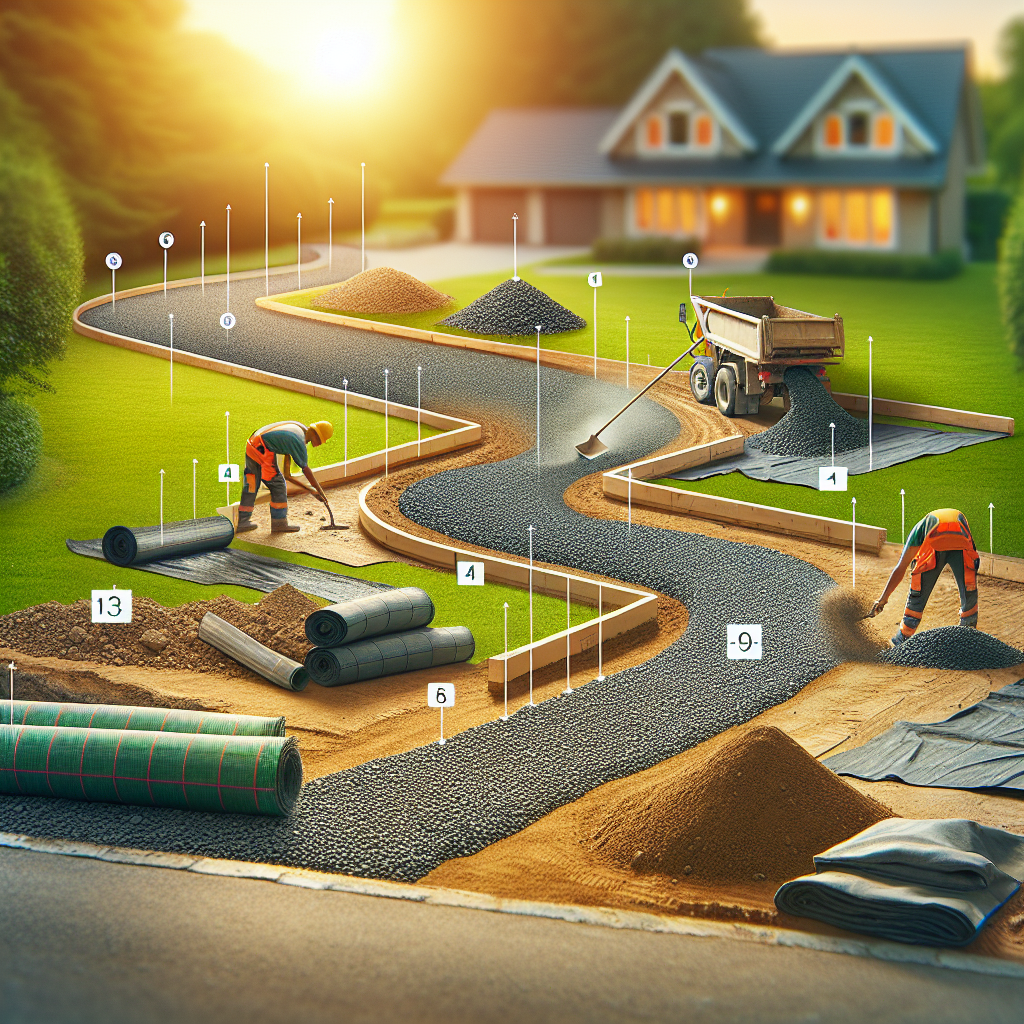
Before adding gravel, a layer of landscaping fabric should be rolled out over the compacted soil. This barrier prevents weeds from growing up through your driveway and adds an additional level of stability.
After preparing the soil and laying down the landscape fabric, it’s time to add your first layer of rocks. You’ll want large, baseball-sized rocks for this initial layer. These larger rocks create tiny gaps that allow water to drain through easily and provide solid support for the smaller rocks on top. The layer should be approximately three to four inches thick and evenly distributed across your entire driveway base.
Once again, use your plate compactor to tamp down this layer of rocks until they’re firmly embedded into the soil. With that, you’ve completed the most important part of your driveway preparation – establishing a solid, well-drained base that will support the weight of your vehicles and resist displacement from weather and use.
In conclusion, when asking yourself “how do I make a gravel driveway?”, remember to pay special attention to preparing the driveway base. This step is crucial for a durable and reliable gravel driveway that will last for years to come.
Laying the Gravel
Now that we’ve cleared and prepped the area, it’s time to focus on the next important step: Laying the gravel. This is arguably the most crucial part of our ‘How do I make a gravel driveway’ guide because incorrect methods can lead to issues such as ruts and water logging.
First, choose your gravel type – typically a crushed stone mix varying in size from 1/2 to 2 inches. A blend of sizes helps the gravel lock together to form a solid surface. The depth of your driveway gravel should ideally be about 4 inches. For heavy vehicles or poor drainage conditions, consider increasing to 6 inches.
The process of laying the gravel is straightforward but can be labor-intensive if you’re doing it manually. It’s usually delivered in a dump truck and deposited at the start of your driveway. Spread it evenly across the area using a rake, ensuring there are no high or low spots. Then, using a mechanical roller or plate compactor, compress the gravel into the soil. Compacting will help prevent sinking and rutting.
If your driveway slopes, begin laying and compacting gravel from the bottom up. This way, any excess material will naturally move downhill with gravity, making for more efficient distribution.
Once compacted, check for any uneven areas and add more gravel if necessary. After laying down and compacting the first layer of stone you can now add an additional layer of finer gravel to provide a smooth finish on top.
Last but not least, ensure proper drainage is considered in your ‘how do I make a gravel driveway’ plan. Driveways should have a crown or high center that tapers off to each side, allowing water to drain off easily rather than pool on your newly laid surface.
Laying the gravel may seem like an overwhelming task but remember that proper preparation and patience will ensure a long-lasting, functional driveway. It’s all about taking one step at a time and knowing that the effort you’re putting in will enhance not just the aesthetic appeal of your home, but also its value.
So there you have it! You’re now well-equipped to tackle the task of laying gravel for your new driveway. Armed with these insights and tips, ‘How do I make a gravel driveway?’ is a question you can now answer with confidence. Happy building!
Maintaining Your Gravel Driveway
After completing the task of ‘How do I make a gravel driveway?’ it is essential to maintain it properly to ensure its longevity and aesthetics. Although gravel driveways are known for their durability, they are not indestructible and require regular maintenance to keep them in good condition.
Regular raking is one of the most straightforward tasks for maintaining your gravel driveway. It helps distribute the stones evenly, thereby avoiding the formation of potholes. Ideally, you should rake your gravel driveway at least once a month or anytime you notice an uneven distribution of the stones.
Grading your driveway is another crucial part of its maintenance regime. Over time, rain can wash away parts of your driveway, causing dips and grooves. To grade your driveway, use a landscaping rake or a box scraper to even out those areas. Severe cases may need professional assistance.
A common issue with gravel driveways is weed growth between the rocks. A simple solution to this is using herbicides; however, if you prefer a more natural approach, consider laying down a weed barrier before adding gravel, or manually removing them regularly.
Furthermore, potholes are not just an eyesore but can also be harmful to cars. If you notice any developing on your driveway, fill them up immediately using extra gravel and compact it down using a tamper or roller.
The weather also plays a significant role in maintaining your gravel driveway. During dry seasons, consider watering your driveway slightly as it will help keep the dust down and allow better compaction. On the other hand, during wet seasons or in snowy areas, make sure not to plow too deep – scraping up anything deeper than two inches can bring large rocks to the surface and ruin the top layer of fine gravels.
Regular replenishing of gravel is also essential. Ideally, you should add new gravel every two to four years, depending on the traffic and weather conditions. This will ensure your driveway maintains its functionality and curb appeal.
In conclusion, although creating a gravel driveway might seem like a daunting task initially, with the right materials and regular maintenance, it can serve as a durable, cost-effective, and visually pleasing solution for many homeowners.
Conclusion
In conclusion, the process of making your own gravel driveway may initially seem to be a daunting task, but with some strategic planning and good old-fashioned hard work, it’s certainly doable. We hope this article has aptly answered the question “How do I make a gravel driveway?” and provided you with an easy to follow guide to constructing your own.
The materials required such as gravel, geotextile fabric, and landscape stakes are all readily available at home improvement stores and online. The key to the successful completion of this project lies in proper preparation, patience, and attention to detail. Remember to always focus on maintaining an even layer of gravel throughout your driveway, as this will help ensure its longevity and usability.
It’s worth noting that while making a gravel driveway can be a cost-effective solution compared with asphalt or concrete driveways, it does require some ongoing maintenance. This includes reapplication of gravel when necessary, the regular removal of weeds, and checking for signs of erosion or other damage.
But don’t let this deter you! The charm and natural beauty that a gravel driveway brings to your property makes the effort worthwhile. It could elevate the curb appeal of your home and even increase its value. Plus, the satisfaction of completing a substantial home improvement project on your own is an accomplishment that you can take pride in.
If you’ve never embarked on a DIY project of this scale before, ‘How do I make a gravel driveway?’ might have seemed like an intimidating question at first. However, we hope that this guide has demystified the process for you. With careful planning, precision and patience, you can create an attractive and practical gravel driveway that lasts for many years.
Finally, remember that every project is a learning experience – don’t be too hard on yourself if things don’t go perfectly right away. Be willing to make adjustments and corrections as needed, and don’t shy away from seeking professional help if necessary. Good luck on your gravel driveway project!