Introduction
Welcome to our blog post on ‘How to pour concrete slab for patio’. Crafting a patio from scratch can be an incredibly rewarding project for any homeowner, no matter their skill level. The outdoor space can serve as an extension of your home, providing you with a perfect spot for hosting outdoor events or simply enjoying a quiet evening in nature. One of the most popular materials for creating sturdy, long-lasting patios is concrete, and in this blog post, we’ll walk you through the steps on how to pour a concrete slab for your patio.
Why choose to pour a concrete slab for your patio? Concrete is a highly versatile material that offers numerous benefits over other choices. It’s durable, weather-resistant and can easily withstand heavy foot traffic and furniture. It also requires minimal maintenance, making it an ideal option for homeowners who want a patio that looks good and lasts long without requiring constant care. Moreover, you can personalize your concrete patio by adding color or texture to the concrete mix before it’s poured or by utilizing decorative techniques after it has been laid.
Although pouring concrete might seem daunting at first, with the right tools, materials, and guidance, it’s entirely achievable as a DIY project. This blog post aims to demystify the process of pouring a concrete slab for a patio and gives you the knowledge and confidence you need to carry out this project successfully. From preparing the ground to mixing the concrete and finally pouring it, we will guide you through each step meticulously.
By the end of this guide on ‘How to pour concrete slab for patio’, we hope that you will be well equipped to take on this project head-on. So pull up those sleeves, gather your tools and let’s dive into the process of transforming your outdoor space! Remember – patience is key here. Pouring a concrete slab is not difficult per se, but rushing through it can lead to mistakes that might affect the final result. So take your time, follow the steps carefully, and soon you will have a beautiful concrete slab patio to enjoy and be proud of.
Materials Needed
Constructing a patio is a doable DIY project, but you need to ensure that you have all the necessary materials at hand before you begin. Here’s a list of what you’ll need on ‘How to pour concrete slab for patio’.
1. Concrete: This is the primary material you’ll need. The amount will depend on the size of your patio. Make sure to purchase ready-mix concrete, which only requires the addition of water.
2. Wooden stakes and boards: These are used to create the formwork or mold for the concrete slab. You’ll need plenty of straight wooden stakes and 2×4 board planks to frame out your patio to the desired shape and thickness.
3. Shovels and wheelbarrow: Shovels will be used for digging the area where the concrete slab will be poured, while the wheelbarrow is for transporting the mixed concrete from its mixing location to your patio.
4. Concrete mixer or large container: For larger patios, a concrete mixer can make short work of combining water and cement. If you’re working on a smaller scale, a large container and stirrer will suffice.
5. Spirit level: Ensuring that your poured slab is level is crucial for good aesthetic results and practical use of your patio. A quality spirit level is an indispensable tool for this process.
6. Floats and trowels: After pouring the concrete, these tools are used to spread, smooth, and finish it. A bull float is used first to press down aggregate and bring more cement paste up to the surface; then a trowel is used for final smoothing.
7. Compactor: Before pouring the slab, the ground needs to be compacted. A plate compactor can do the job efficiently.
8. Reinforcing Mesh: To prevent cracks and provide additional strength to your concrete patio, a reinforcing mesh is needed. This is placed before you pour the concrete.
9. Plastic sheeting: After pouring the concrete slab, it’s important to allow it to cure slowly to prevent cracking. Covering it with plastic sheeting helps retain moisture during this process.
10. Protective gear: Always remember that safety comes first when working with concrete. You’ll need gloves, safety glasses, and work boots to protect yourself from harming by wet cement.
Once you’ve gathered all these materials, you’re ready to move on to the next step of learning ‘How to pour a concrete slab for patio’.
Choosing the Right Concrete
While learning how to pour a concrete slab for a patio, one of the most critical steps is choosing the right concrete. The choice of concrete will play a significant role in determining the durability, strength and overall finish of your patio. There are numerous types of concrete available on the market today, and each comes with distinct properties that make them suitable for certain conditions.
When deciding how to pour concrete slab for patio, you have to keep in mind that not all types of concrete are suitable for outdoor use. For a patio, it’s advisable to use a type of concrete known as ‘Ready-Mixed Concrete’. This type of concrete is pre-mixed at a batching plant or factory according to specific proportions and then delivered to your site in a condition ready for placement. It saves time and guarantees consistency in terms of quality as all you need to do is pour it into your designated patio area.
While choosing ready-mixed concrete, there are still several factors you need to consider. Firstly, think about the weather conditions in your location. If you live in an area prone to freezing temperatures, you might want to opt for air-entrained concrete. This type of concrete has tiny air bubbles that allow it to expand and contract without cracking during freeze-thaw cycles.
Secondly, consider the load your patio will likely bear. If you anticipate heavy furniture or vehicles being placed on your patio, high-strength concrete is recommended. This type of concrete can withstand more pressure without cracking or buckling.
Lastly, aesthetics should also be factored into your decision when considering how to pour concrete slab for patio. Do you prefer an exposed aggregate finish or a smooth finish? Different types of concrete will give different finishes so choose one that suits your desired aesthetic.
In conclusion, choosing the right concrete for your patio is crucial because it determines the durability, strength, and appearance of your patio. It’s always advisable to discuss with a concrete supplier or a building expert before making your final decision, as they can offer professional advice tailored to your specific circumstances and requirements.
Preparing the Site
Before you dive into the steps of ‘how to pour concrete slab for patio’, it’s crucial to start with ensuring the site is adequately prepared. The success of your patio project heavily relies on this phase as it lays the foundation for a smooth, level and durable concrete slab. So, how do you go about preparing your site?
Firstly, begin with marking out the area where you plan to pour your concrete slab. You can use stakes and string to outline the shape of your future patio. It will not only provide a visual guide but also help in measuring out the amount of materials needed. The size of your patio will determine the amount of concrete mix required, so accurate measurements are essential.
Once you have marked out your area, it’s time to start excavating. This step involves removing any grass, plants or debris from the selected site. Using a shovel or a garden hoe, dig down to about 6 inches deep or until you reach hard, compact soil. This depth will provide sufficient room for both the gravel base and the concrete slab.
The next step in preparing the site is leveling and compacting the ground. After excavating, ensure that the surface is flat and even to prevent any future cracking or sinking of your patio slab. A long straight board can be used as a screed to level across the top of your formwork to ensure a flat surface at finish grade. Utilize a hand tamper or plate compactor to compact the soil which helps in preventing any future settling.
Drainage plays an incredible role in maintaining the durability of your patio slab over time. Make sure there is a slight slope away from any adjacent structures to allow water runoff and prevent pooling on your new patio. Typically, you would want your patio to drop 1/4 inch per foot.
Once you’ve achieved a level and compact surface, it’s time to add a sub-base. This usually involves spreading a layer of gravel or crushed rock that will aid in drainage and provide a stable base for your concrete. Depending on your specific patio needs, you may also need to install rebar or wire mesh into your form to reinforce the concrete and prevent cracking.
Finally, it’s time to create your formwork. This is the wooden structure that holds the wet concrete in place while it hardens. Ensure it is firmly secured to avoid any displacement during the pouring process.
After following these steps, you’re now ready to move on to the phase of ‘how to pour concrete slab for patio’. Remember, adequate site preparation is key to achieving a successful and lasting outcome.
Forming the Patio Base
Before diving into ‘How to pour concrete slab for patio’, it is important to understand that the success of your project heavily depends on the preparation. The most integral part of this preparatory phase is forming the patio base. A well-constructed base ensures longevity and durability of your patio. Here’s how to form the patio base.
First, you need to outline your patio area. Use landscaping paint or stakes and string to mark the boundaries exactly where you want your patio to be. Make sure it’s square, and double-check all measurements.
Next, you need to dig out the area within these boundaries. This excavation process involves removing grass, soil, and any debris down to a depth of about 7-8 inches for a typical patio. It’s important for the base to be deep enough to provide a strong foundation that can withstand the weight of the concrete slab, as well as potential environmental pressures. Renting a mini excavator can make this process easier and faster.
Once you’ve dug out your patio area, the next step is compacting the soil. This is done using a plate compactor or hand tamper. Compacting hardens the soil surface and makes it less likely to shift or settle over time, which could lead to cracking in your concrete slab.
After compacting, it’s time to add a layer of gravel. Adding 4-5 inches of gravel creates a solid, stable base for your concrete slab. It also ensures proper drainage when it rains. The type of gravel used typically varies locally but crushed stone is often used for this purpose.
Spread the gravel evenly across your entire work area using a rake then compact it down just as you did with the soil. Ensure that it’s level by checking in several places with a straight edge and level—you don’t want any surprises when you start pouring your concrete!
Finally, on top of the gravel, install a layer of mesh or rebar to reinforce the concrete and prevent cracking. This is particularly important for larger patios or those that will need to support a lot of weight.
By following these steps, you’ll be ready to pour your concrete slab for your patio. Remember, a well-formed base is crucial to the success of your project. So, take your time in forming the patio base before learning how to pour concrete slab for patio.
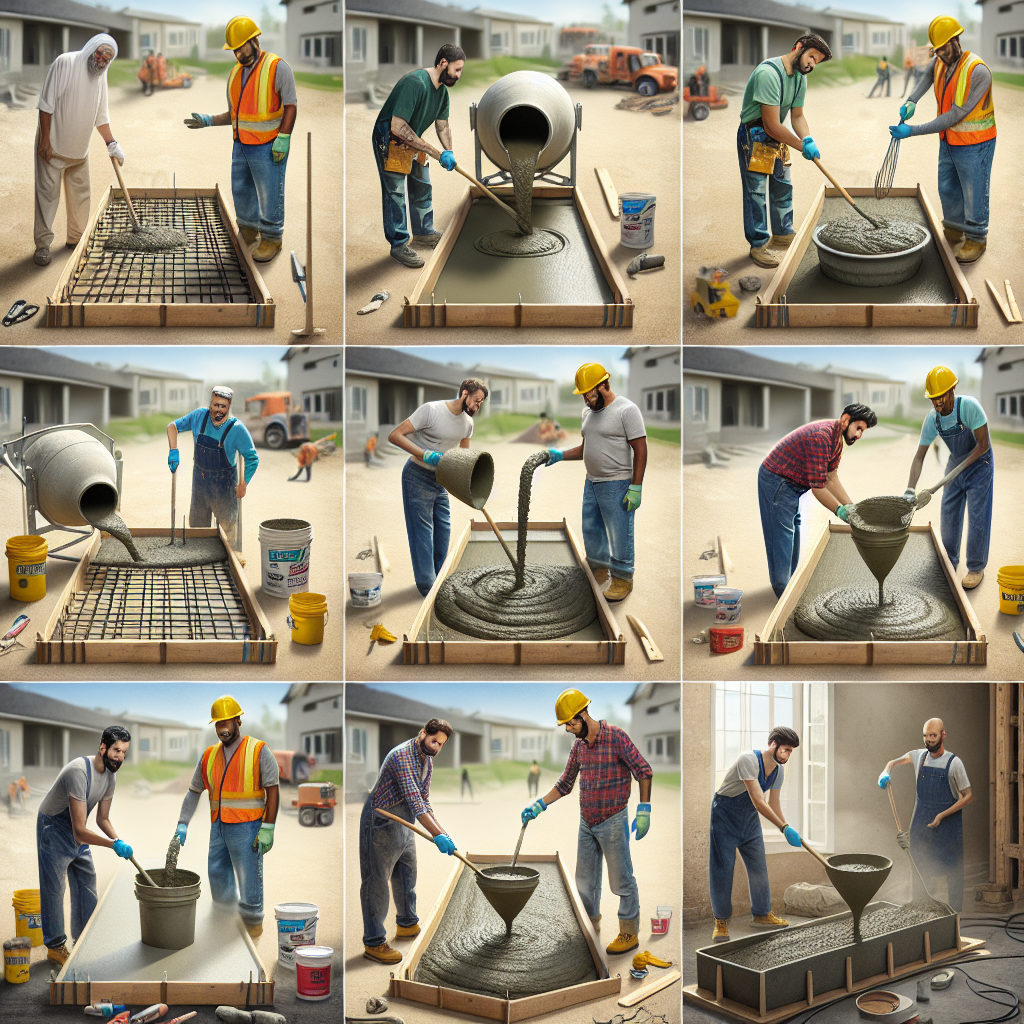
Mixing and Pouring the Concrete
One of the most crucial stages in the process of creating your patio is properly mixing and pouring the concrete. This section details exactly ‘How to pour a concrete slab for your patio’ efficiently and effectively.
To start, you’ll need to procure the right amount of concrete mix. You can typically find this at any home improvement store. The amount needed will depend on the size of your patio, so be sure to do your calculations correctly. Once you have your concrete mix, it’s time to get mixing!
You can mix concrete manually or by using a cement mixer. If you’re mixing manually, make sure that you mix on a hard, level surface to prevent spillage and waste. A wheelbarrow or large bucket would work perfectly for this scenario.
Start by adding water to your container followed by the concrete mix. As a general rule, use approximately 2.5 litres of water for every 20kg bag of concrete mix. Stir the mixture until it reaches a thick, oatmeal-like consistency. If it’s too dry, add more water; if it’s too wet, add more concrete mix.
Once the mixture is ready, it’s time to pour! Begin at one corner of your formwork and slowly move across. Use a shovel or trowel to spread the mixture evenly throughout the formwork, ensuring that all areas are adequately covered.
As you’re pouring, keep a careful eye on your depth markers that ensure you’re maintaining an even depth across the entire slab. Pouring too much or too little in certain areas could lead to an uneven surface or structural issues later on.
Once you’ve filled your formwork with the mixed concrete, use a screed board (a straight, flat piece of wood) to level off the top surface of the slab. Move it back and forth across the top of the formwork in a sawing motion, removing any excess concrete as you go. After this step, leave your newly poured slab to set for at least 24 hours before moving onto the next stage – curing the concrete.
Learning how to pour a concrete slab for your patio might be challenging at first, but with practice and patience, you’ll be able to create a long-lasting, durable surface that will serve as the foundation for many enjoyable days spent outside.
Levelling and Finishing the Slab
Once the concrete is poured, the next critical steps in creating your patio are levelling and finishing the slab. A well-levelled and finished patio will not only look aesthetically pleasing, but it will also ensure that water drains correctly, preventing any future damage.
Levelling the Slab
The process of levelling, also known as screeding, involves smoothing out the concrete mixture to create an even surface. This is typically done using a long 2×4 piece of lumber or a purpose-made screed tool. You’ll need to carefully manoeuvre your tool of choice across the top edges of your formwork, cutting off excess concrete and filling in any low spots.
It’s important to have a friend help you with this step if your patio is on the larger side. One person can hold one end of the screed board while the other person pulls it towards them, using a sawing motion to level out the concrete. Remember to move slowly and meticulously; rushing this process can create an uneven surface.
Finishing the Slab
After screeding, you’ll need to wait until the concrete has lost its sheen before starting the finishing process. The timing for this can vary based on temperature and humidity levels, so it’s important to keep a close eye on your slab.
Start by running a float over the slab, which will help draw moisture to the surface while also filling in any tiny holes for a smoother finish. After floating, you may want to add texture with a broom for slip resistance – particularly important for outdoor spaces like patios. This is done by lightly dragging a broom across the surface of the slab.
If you want a smoother finish (typically desired for indoor floors), you can use a steel trowel after the floating process. However, be aware that this will make the surface quite slick when wet – not always the best choice for an outdoor patio.
By understanding how to pour concrete slab for patio, as well as levelling and finishing it, you’re well on your way to creating a beautiful and functional outdoor space. Remember, patience is key – allowing each step to properly dry and set will help ensure the longevity and durability of your patio.
Curing the Concrete slab
Once you’ve learned how to pour concrete slab for patio, it is crucial not to overlook the next important step – curing the concrete. Curing is a vital process that helps in maintaining the moisture levels within a concrete slab once it starts hardening. The goal is to prevent too much water from evaporating, which can lead to cracks and reduced strength.
To start with the curing process, you need to wait until the concrete has lost its sheen or glossy wet look. This usually takes about 4-5 hours, depending on the weather and temperature. Do not begin curing too early as it may spoil the finishing of your slab.
The simplest method of curing involves using plastic sheets or curing blankets. Lay these out over the concrete slab and secure them on all edges using heavy bricks or stones to prevent them from blowing away. This creates a barrier that holds in moisture, enabling proper hardening of the mixture. If you’re working during hotter months, consider using light-colored sheets that reflect sunlight and reduce heat absorption, which can cause rapid evaporation.
An alternative to plastic sheeting is the use of curing compounds. These are available in spray form and applied directly onto the slab’s surface. They form a thin layer that traps moisture within the slab but permit excess water vapor to escape.
Keep in mind that proper curing takes time and patience – usually around one week for most residential applications. However, for best results, consider extending this period up to a month. Remember, the longer you allow your concrete to cure, the harder and more resilient your slab will be.
Learning how to pour concrete slab for patio and properly cure it is key in ensuring durability and longevity of your outdoor space. With careful planning, patience and following these steps closely, you are one step closer to enjoying your beautiful new patio.
Maintaining Your Patio Slab
Now that you’ve learned how to pour concrete slab for patio, it’s important to keep it maintained in order to prolong its lifespan and keep it looking as good as new. Regular upkeep will not only improve the aesthetics of your outdoor space but also boost your property’s overall value. Here are some tips for maintaining your patio slab.
Firstly, cleaning is an essential part of maintenance. Use a power washer or a hose to clean off dirt, leaves, and other debris. You can use a mild detergent if the slab is very dirty. However, avoid using harsh chemicals that can deteriorate the concrete over time.
Sealing your patio slab is another way to protect it from water, sun, and other types of wear and tear. Concrete sealers can be applied to provide a barrier against these damaging elements. They also enhance the color of the concrete and add a glossy finish. Depending on the weather conditions in your area and how much use your patio gets, you’ll likely need to reseal your concrete every two years.
Keep an eye out for cracks because even minor ones can become major problems if they’re not dealt with promptly. If you notice small cracks, you can repair them yourself using a concrete patching compound. For larger cracks or any structural damages, it’s best to hire a professional.
In winter months, avoid using deicing chemicals on your patio slab as they can cause surface damage such as scaling and spalling. Instead, opt for sand for traction or use a snowblower or plastic shovel to remove snow.
To prevent stains, deal with spills immediately. If a spill has already dried or set into the concrete, consider using a commercial concrete stain remover.
If your patio slab is painted or stained, it may require some touch-ups over time. Check for any chipping or peeling paint and retouch as needed to maintain a fresh, vibrant color.
Remember, the best way to protect your investment in your patio is through regular cleaning and maintenance. Your patio slab was a significant project, and with proper care, it can provide many years of enjoyment for you and your family.
Conclusion
As we draw this detailed guide on ‘How to pour a concrete slab for patio’ to a close, it is important to reiterate the importance of following each step meticulously. While it may seem like a daunting task at first, the process of pouring a concrete slab for a patio isn’t as complicated as it might initially appear. With the appropriate tools, a clear understanding of the steps involved and careful planning, you can successfully complete this project yourself.
Your patio is an excellent extension of your living space, and having it well-done creates an enticing outdoor area for relaxation, family gatherings, or barbecues. The beauty of understanding how to pour a concrete slab for patio lies not just in saving costs but also in the satisfaction derived from accomplishing such a project.
Beyond skills acquisition, knowing how to pour a concrete slab for your patio equips you with essential maintenance knowledge. This way, you understand better how to care for your patio and extend its longevity.
Remember that preparation is key in this process. From calculating the amount of concrete needed to preparing the area where the slab will be poured, every detail matters. Do not forget to pay attention to curing the concrete properly as well. This is vital for the strength and durability of your slab.
As much as this seems like a lot, don’t be discouraged. If after reading through this guide you still feel unsure about any step in pouring a concrete slab for your patio, do not hesitate to seek professional help. There are numerous professionals out there who can get the job done efficiently.
In conclusion, learning how to pour a concrete slab for patio is an exciting DIY project that can greatly enhance your outdoor living space. Though it might require some effort and patience, with proper guidance and implementation of the steps outlined above you can transform your backyard into an inviting and stylish retreat.