Introduction
Whether you are keen on tackling a new DIY project or planning a home extension, understanding the basics of ‘how to pour a cement slab’ is an essential skill. In construction, cement slabs are incredibly versatile and can serve as the foundation for various structures such as garden sheds, patios, or even your new house. Cement slabs, also known as concrete slabs, offer a robust and stable base that can withstand substantial weight and last for years – if done right.
The process of pouring a cement slab might seem intimidating at first. However, with the proper preparation, tools, and step-by-step guidance, it can be a manageable task even for those who aren’t construction professionals. If you’re ready to get your hands dirty and learn something new along the way, then this blog post is perfect for you. By the end of this guide on how to pour a cement slab, you’ll have all the knowledge necessary to undertake your next big project with confidence.
It’s important to note that pouring a cement slab isn’t just about mixing cement and spreading it out on the ground. It involves various steps including site preparation, creating forms, installing reinforcements, mixing and pouring concrete, and finally finishing and curing the slab. Each step requires careful attention and precision to ensure the longevity and durability of your slab.
In this blog post, we’ll take you through each of these steps in detail. We will provide tips and tricks for overcoming common challenges one might encounter during their DIY journey in pouring a cement slab. From understanding what type of cement is best-suited for your project to determining how much material you’ll need; from how to prepare the site to how to mix your concrete correctly; from the right way to pour it evenly to how long it should cure – we’ve got all bases covered!
Whether you’re an experienced builder looking for a refresher or a newbie DIY enthusiast ready to dive into your first project, this comprehensive guide on ‘how to pour a cement slab’ is the perfect starting point. So, roll up your sleeves and let’s get started!
Necessary Tools and Materials
Before you start learning how to pour a cement slab, it’s essential to understand the necessary tools and materials you will need. Having the right equipment at hand not only facilitates the process but also ensures that the end result is of high quality.
Firstly, you cannot talk about pouring a cement slab without mentioning the primary material, cement. Concrete mix is readily available in most home improvement stores, and you should choose one that suits your specific requirements. Understanding the size of your slab will help determine how much you need. Generally, a 60-pound bag can cover roughly a quarter of a square foot if poured four inches thick.
The other significant material is water. Mixing water with your concrete forms a paste that binds with sand and rock to harden into an impressive weight-bearing substance. Use clean water free from acids, alkalis, or oil.
Now, let’s move on to the tools required for this project:
- Wheelbarrow or mixer: Mixing concrete requires either of these tools. A wheelbarrow and shovel are adequate for smaller projects while a cement mixer can save time and energy on larger slabs.
- Shovels: A square-end shovel is ideal for mixing in a wheelbarrow or mortar pan while a pointed-end shovel helps dig the ground where your slab will be poured.
- Cement hoe: This tool is specifically designed to mix concrete. It has a large blade with two holes through which you can push and pull materials.
- Concrete float: A float helps level and smooth the freshly poured concrete before it begins to harden.
- Tape measure, stakes, and string line: If you want a well-aligned and level slab, you’ll need these tools to mark out your slab dimensions accurately on the ground.
- Protective Gear: Don’t forget about safety. Goggles, gloves, and boots are necessary to protect you from the caustic nature of wet concrete.
All these tools and materials are essential to learning how to pour a cement slab efficiently and safely. Remember, working with concrete requires precision and patience. The secret lies in getting the mixture right and ensuring it is evenly leveled for a smooth finish. Armed with these tools and materials, you’re now ready to begin pouring your cement slab.
Safety Precautions
When learning how to pour a cement slab, safety precautions must be prioritized. Accidents can happen when dealing with materials and equipment of this nature. The following are tips on how to ensure your safety while working.
Firstly, always wear the right safety gear. This includes safety glasses, gloves, long pants, boots and a long-sleeved shirt to protect you from cement burns. Wet cement is caustic and can cause serious skin burns if it comes into contact with your skin. To avoid injury to your lungs, use a respirator or dust mask when handling cement powder, especially during mixing. Cement dust can cause lung disease and other health problems if inhaled over time.
Secondly, be aware of your surroundings. Do not work in a cramped space with insufficient lighting. Ensure the area is well-lit and free from obstacles that could cause trips and falls. When using large equipment like a cement mixer or wheelbarrow, make sure there is plenty of space for operation.
Thirdly, ensure you have been properly trained on the use of all equipment involved in pouring a cement slab. Misuse of tools or machinery can lead to severe injuries. If you are unsure about how to use a particular machine or tool, seek guidance from a professional.
Lastly, never work alone when pouring a cement slab. Accidents can happen quickly and having someone there could be lifesaving if an emergency arises. It’s also important to keep children and pets away from the worksite as they can easily be injured by heavy tools or machinery.
In conclusion, it’s vital to take these safety precautions seriously when learning how to pour a cement slab. Always equip yourself with the necessary protective gear, work in a safe environment, use machinery correctly and never work alone. Following these guidelines will help you complete your project safely and efficiently.
Choosing the Right Type of Cement
When it comes to the task of figuring out how to pour a cement slab, one of the most important decisions you’ll have to make is selecting the right type of cement. There are several different types of cement available in the market today, and each one has its unique properties and uses. Your choice of cement will largely depend on the specific requirements of your project.
Commonly used types include Type I (general purpose), Type II (moderate sulfate resistance), Type III (high early strength), Type IV (low heat of hydration), and Type V (high sulfate resistance). The differences among these types relate to their level of resistance to different chemicals and their setting speed.
Type I, or Ordinary Portland Cement (OPC), is the most common type used for most general concrete projects, including slabs. It provides a good balance between strength and cost. However, if your slab is going to be exposed to severe weather conditions or will be under significant load, you might want to consider a more specialized type.
Type II cement is resistant to moderate sulfate attacks which makes it suitable for use in structures that will be in contact with soil or groundwater with higher than normal sulfate levels. Type III, on the other hand, gains strength more quickly than other types and is ideal for projects with tight schedules but it generates more heat during the curing process which can cause cracks in larger slabs.
Type IV cement generates less heat during hydration making it well-suited for massive concrete structures where temperature control is critical. Lastly, Type V cement offers high resistance against sulfate attacks and is ideal for use in environments with high levels of sulfates in soil or water.
For home projects such as driveways, patios, or sidewalks where there are no extreme conditions present, regular Type I cement should suffice. But if you’re working on a larger project, or one with specific needs, it’s important to understand the different types of cement and their uses.
Remember, picking the right cement is as crucial as getting the proportions correct in the mixture. It’s what makes your slab strong and durable. So take your time, do your research, and make sure you choose the type that’s most appropriate for your project to ensure you know how to pour a cement slab effectively and efficiently.
Preparing the Ground
Preparing the ground is the most critical step in learning how to pour a cement slab. This essential first step will determine the longevity and durability of your cement slab and it includes various steps to ensure you get it right. If done correctly, this could save you a lot of time, effort, and money on future repairs.
The first thing you need to do is to clear the area where you plan to pour the cement slab. Remove any grass, rocks, or debris in the space. This debris can affect the stability of your slab and make it uneven. If there are tree roots in the way, you will need to excavate them as they can cause cracks in your slab over time.
Once you have cleared the space, it’s time to level the ground. A flat surface is necessary to evenly distribute the weight of anything that rests on the slab. You can use a shovel or a rototiller to break up clumps of soil, then smooth it out with a rake. To check if your ground is level, place a long straight edge on top and use a level tool. If necessary, add or remove soil until your base is perfectly level.
After leveling, compacting your soil is crucial. Compact soils provide a solid base for your cement slab, preventing it from shifting or sinking over time. You can rent or purchase a vibrating plate compactor for this purpose. It’s important to compact in stages if your area is deep, ensuring each layer is firm before adding another.
Next comes preparing drainage. When learning how to pour a cement slab, it’s important not to overlook this step as proper drainage prevents water from pooling on your slab which could cause damage over time. If your area has poor natural drainage, consider installing an artificial one such as a French drain system.
Finally, install your formwork. This will outline the shape of your slab and contain the poured cement until it hardens. You can create formwork using wooden planks or metal forms, staking them around the perimeter of your cleared area.
Remember that time spent on thorough ground preparation is time well invested when pouring a cement slab. It may seem like a daunting task, but it sets the stage for the building process and determines the overall quality of your final product.
Creating a Form for Your Slab
Before you learn ‘How to pour a cement slab’, it’s important to understand the process of creating a form for your slab. A form is essentially a frame that holds the wet, poured concrete in place until it dries and hardens. It’s the blueprint of your cement slab, determining its shape, depth, and overall dimensions. Here are some steps to guide you through the preparation process.
Firstly, you need to choose the right material for your form. The most commonly used materials are wood and metal, but other materials can be used as well depending on the application. For regular-sized slabs, wooden forms made from 2x4s or 2x6s are generally suitable. These should be sturdy enough to hold back the weight of the concrete without bending or breaking.
Next, measure and cut your form material according to the desired dimensions of your slab. Remember to consider both length and width along with the thickness of your slab. Once cut, assemble these pieces at the designated area.
Securing your form is crucial for maintaining its shape during the pouring process. You can use stakes driven into the ground outside of your form to help hold it in place. If necessary, brace the stakes with more wood or metal to ensure they do not move under the weight of the concrete.
Lastly, you need to level your form. This process ensures that your finished slab will be flat and even across its entire surface. Use a carpenter’s level to confirm that all sides of your form are horizontal. If they’re not, adjust them by digging underneath or adding soil until you reach the desired level.
A well-constructed form is essential in learning how to pour a cement slab properly. It defines not only the shape but also the size and thickness of your slab. By following these steps, you can create a form that will hold your pour securely and ensure a smooth, even finished slab.
Once your form is completed and secured in place, you are now ready to move on to the next step: mixing and pouring the concrete. This process requires careful preparation and attention to detail, but with the right tools and a little patience, you too can pour a cement slab like a pro.
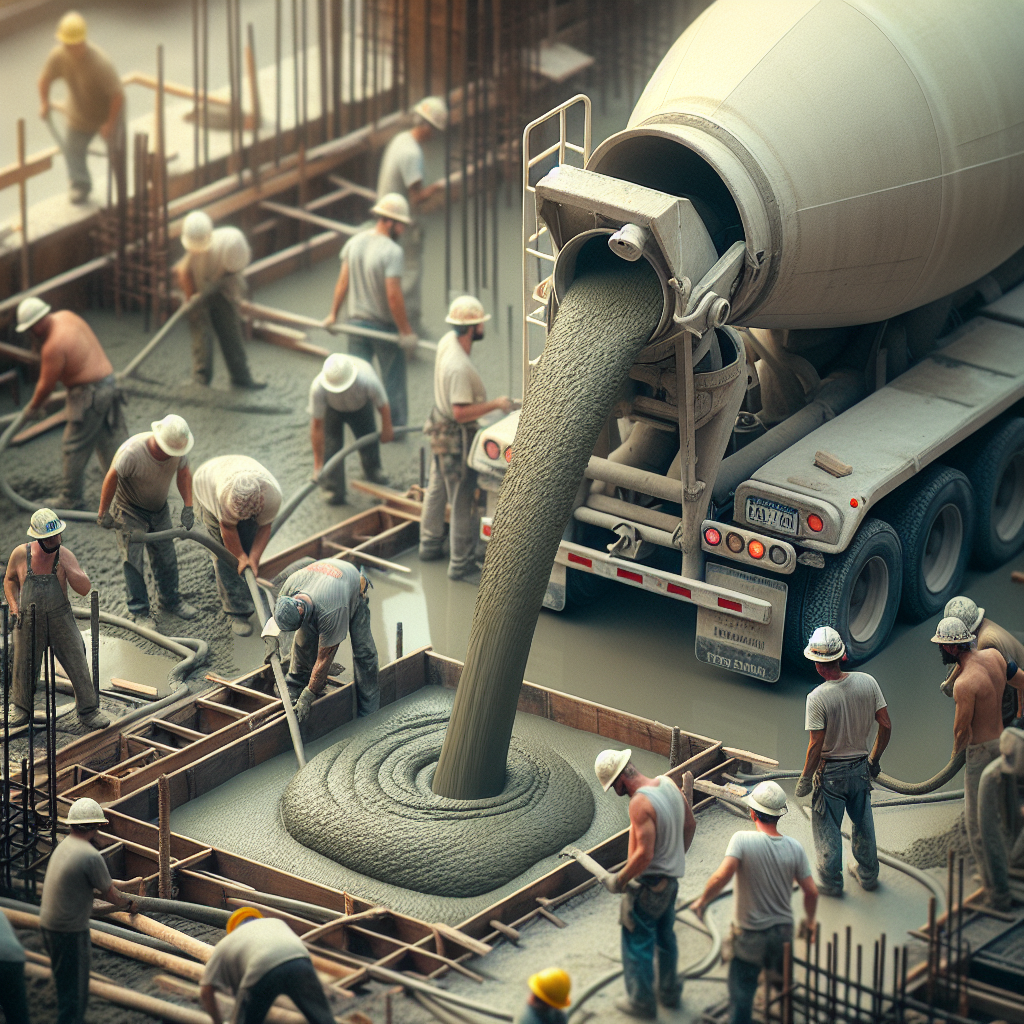
Mixing and Pouring the Cement
Once you have the area prepared and ready, it’s time to get down to the heart of the matter when learning how to pour a cement slab: mixing and pouring the cement. The process is not as complex as it may sound, but attention to detail is crucial to create a sturdy and smooth slab.
Begin by purchasing ready-mixed concrete or creating your own blend. If preparing your own, ensure you follow the manufacturer’s instructions regarding the proper proportions of cement, sand, and gravel. Pour the dry mix into a wheelbarrow or mortar pan and make a well in the middle. Add water into the well gradually while stirring until you achieve a thick, but pourable consistency.
Remember, the consistency of your cement mixture is key to the success of your slab. The mixture should be smooth, with no pockets of dry powder. It should be wet enough to pour easily but not so liquid that it fails to hold its shape. Getting this balance right might take some experimentation if you’re new to this work.
Once your concrete mix is ready, it’s time for pouring! Start from one corner of the formwork and work your way across. Pouring too much in one place at once can cause an uneven surface. Instead, distribute it evenly throughout the formwork and ensure each layer is sufficiently compacted before adding another.
An important reminder when learning how to pour a cement slab: don’t forget to level off your concrete after each pour. You can use a straight edge or a screed for this purpose. This tool is designed to be drawn across the top of the newly poured concrete in order to remove excess material and ensure a flat surface.
After you’ve poured and leveled off your concrete, don’t be too quick to call it a day! Concrete needs time to cure properly, which allows it to reach its full strength and durability potential. While it’s curing, keep the surface moist to prevent it from drying out too quickly, which can result in cracks. Depending on the size of your slab and the climate conditions, curing can take anywhere from a few days to a week.
The process of mixing and pouring cement may seem daunting at first, but with a little patience and practice, you’ll soon become adept at crafting your own slabs. Remember, attention to detail and careful preparation are key when learning how to pour a cement slab.
Finishing the Surface
After you’ve completed the initial steps on how to pour a cement slab, it’s time to focus on finishing the surface. This is an essential part of the process that ensures the durability and visual appeal of your concrete slab. A well-finished surface not only looks visually appealing but also stands up to wear and tear, providing longevity to your slab.
To begin with, you’ll need a bull float, which is a large, flat, rectangular piece of wood or magnesium with a handle. The bull float helps push larger aggregate below the concrete surface and bring the “cream” or paste of the concrete to the top. This cream becomes the smooth, durable surface of your finished slab. Move the bull float back and forth across the surface in a fanning motion, careful not to overwork the area.
Once you’ve gone over the entire slab with a bull float, you should give the concrete some time to set before proceeding with further finishing. The amount of time required will depend on several factors including temperature, wind speed, and humidity. Generally speaking, as long as the surface doesn’t show footprints when you walk on it and is firm enough that water isn’t immediately drawn to the surface when you spray it lightly, it’s ready for further finishing.
The next step in how to pour a cement slab entails using an edger around the perimeter. The edger helps round off edges and prevent them from chipping or cracking once the slab dries. For larger slabs, grooves should be cut every 8-12 feet across to control cracking. These joints can be made using a groover which creates indentations in the concrete.
Finally, depending upon your preference for how you want your finished concrete slab to look, you may opt for either a broom finish or a smooth finish. Broom finishes are commonly used for outdoor surfaces to provide a non-slip surface. Simply drag a concrete broom across the surface to create small ridges that provide traction. For indoor spaces, you may want a smoother finish achieved by going over the slab with a steel trowel or power trowel.
To wrap it up, remember that correctly finishing your cement slab is just as important as its initial preparation and pour. It ensures the longevity and durability of your concrete surface while also giving it a polished, professional look.
Curing the Cement Slab
In the process of creating a robust and durable construction, ‘curing the cement slab’ is a critical step you cannot afford to skip. Once you have successfully accomplished the task of ‘how to pour a cement slab’, it is essential to understand the importance of curing in solidifying and strengthening your slab. Without adequate curing, the concrete slab won’t achieve its full strength potential, leading to an increased risk of cracks, shrinkage, and surface discoloration.
Curing involves maintaining sufficient moisture content and an appropriate temperature in cement slabs, allowing it to hydrate properly. This hydration process initiates as soon as you mix water with cement. The chemical reaction helps the cement particles to bind together, transforming it into a hard, stone-like material.
Start the curing process right after pouring and leveling the cement slab. Initially, keep the concrete surface damp for a minimum of 5-7 days. There are several methods for curing a concrete slab:
- Water Curing: This method involves continually spraying water on the cement slab surface or covering it with wet burlap. It’s important to keep the surface consistently moist.
- Fogging: In this method, you create a fog environment around the slab that reduces evaporation rate and provides ample moisture for proper hydration.
- Ponding: This method involves creating temporary dikes around the slab then filling them with water. However, it’s not suitable for all locations or weather conditions.
- Membrane Curing: Here, you apply a liquid membrane-forming compound that seals off the surface from air and prevents loss of moisture from within the concrete. Remember to apply it only after finishing processes are complete.
While ensuring curing, also maintain a suitable temperature. The ideal temperature for curing is typically between 50 – 90 degrees Fahrenheit. If the temperature is too high, it might lead to rapid evaporation, and if it’s too low, the hydration process will slow down significantly.
Remember, curing is not an overnight process; it takes time and patience. While the initial strength of a cement slab can be achieved in about a week, it can take up to 28 days for it to reach its maximum toughness. So, don’t rush this critical process; allow ample time for your cement slab to cure adequately.
Pouring and curing a cement slab might seem like a challenging task, but with these tips in hand, you are well equipped to get it done right. Achieving a robust and durable cement slab is all about precision in mixing, pouring, and most importantly, curing.
Tips for a Successful Cement Slab Pour
Knowing how to pour a cement slab is an essential skill for any do-it-yourself enthusiast. However, achieving a perfectly poured and leveled cement slab can often be challenging, especially for beginners. Here are some tips that can help you get the job done right.
1. Planning: The first step towards a successful cement slab pour is proper planning. Measure the area where you will pour the cement slab and mark it out using string lines or spray paint. It’s essential to ensure that the ground is level before starting any work.
2. Preparation: Before pouring cement, you need to prepare the ground properly. This includes clearing away any debris or grass in the area and compacting the soil using a compactor. Additionally, you should install a gravel base layer and compact it as well for improved drainage and stability.
3. Formwork: Setting up formwork is another important step in the process of pouring a cement slab. The formwork will hold the concrete in place while it dries and help shape your slab. Ensure that your formwork is square and level for best results.
4. Mixing: The consistency of your cement mix plays a significant role in determining how well your slab will turn out. A good rule of thumb is to aim for a consistency similar to peanut butter; not too runny but not too stiff either.
5. Pouring and Leveling: When pouring the cement, start at one end and work your way across to ensure an even spread. Use a straight edge or screed board to level off the concrete, removing excess along the way. Remember that working with concrete is a race against time, as it begins to set once mixed, so work quickly but carefully.
6. Finishing: After the concrete starts to set, smooth it out using a float. This will push down aggregate and bring the smooth paste to the surface. Once the slab has partially dried, use a broom to create a nonslip finish.
7. Curing: Finally, allow the cement slab ample time to cure properly. This process can take anywhere from 3-7 days. During this time, keep the slab moist by spraying it lightly with water regularly.
By following these tips on how to pour a cement slab, you can ensure that your project is a success. Remember that practice makes perfect, so don’t be disheartened if your first attempt isn’t flawless.
Conclusion
In conclusion, the process of pouring a cement slab may seem like a daunting task to some, however, with careful planning and preparation, it can be achieved successfully. Understanding ‘how to pour a cement slab’ is crucial for any homeowner or DIY enthusiast looking to add value to their home or embark on a new project.
As we’ve discussed, the steps include choosing the right area, preparing the site, setting the forms, pouring the cement mix, leveling and smoothing the surface, and finally curing the slab. It is important to note that each step requires attention to detail and patience to ensure quality output. Remember that failure to properly prepare your site or rushing through the leveling and smoothing process can result in a poor-quality slab that may crack or not provide the sturdy foundation necessary for further construction.
Moreover, safety should never be taken lightly when dealing with cement mix. Always remember to wear appropriate protective gear and take care not to let wet cement come in contact with your skin or eyes. The potential health risks associated with mishandling cement cannot be overstated.
A common theme throughout our discussion on how to pour a cement slab has been the importance of preparation. Properly measuring your site and getting all your materials ready before you start will go a long way in ensuring a smooth pouring process. Similarly, diligently following each step without skipping any will significantly enhance the quality of your final product.
However, if you find this process too complicated or overwhelming for whatever reason, don’t hesitate to seek professional help. Hiring an experienced contractor may cost more initially but it could save you from costly errors in the end. Whether you decide to DIY or hire professionals, understanding ‘how to pour a cement slab’ equips you with valuable knowledge that can help you make informed decisions throughout your construction project.
In summary, pouring a cement slab is a task that requires careful planning, meticulous execution, and patience. But with some diligence and attention to detail, it’s a task that can be accomplished successfully, resulting in a sturdy and durable slab that will serve its purpose for years to come.