Introduction to PVC Plumbing
PVC plumbing, an acronym for Polyvinyl Chloride, plays an integral role in modern residential and commercial plumbing systems across the globe. It is a versatile, durable, and cost-effective solution for a myriad of plumbing needs. If you’ve ever wondered ‘How to PVC plumbing?’, then this post will guide you through everything you need to know.
Your journey into understanding how to use PVC in your plumbing starts here. First, it’s essential to understand what makes PVC so popular. Primarily, the extensive use of PVC in plumbing can be attributed to its strength, lightweight nature, resistance to water corrosion, and affordability when compared to other materials like copper or iron.
Furthermore, it’s worth noting that working with PVC isn’t as daunting as it might seem at first glance. With the right tools and safety measures in place, even novices can carry out simple installations or repairs. However, like any other technical task, how well you handle the job depends on your understanding of the material and process involved. This introduction serves as a pivotal foundation for anyone looking to understand ‘How to PVC plumbing’.
In this blog post, we will delve into the world of PVC plumbing, covering its applications in various areas of both residential and commercial establishments. We’ll also walk you through comprehensive steps on how to cut, fit, and secure PVC pipes for your unique plumbing needs.
Moreover, we will explore the different types of PVC pipes available in the market today. Having such knowledge equips you with the ability to discern the best type of pipe suitable for various applications- from potable water supply lines and irrigation networks to sewer lines and vent stacks.
The post will also touch on essential safety precautions when working with PVC. As much as PVC is user-friendly in many aspects, it’s critical to handle it properly to avoid accidents like hand injuries or eye damage, especially when cutting pipes.
By the end of this blog post, you will have gained in-depth knowledge on ‘How to PVC plumbing’, allowing you to carry out your DIY projects more confidently and safely, or better understand the work that professional plumbers do in your home or office.
In a nutshell, PVC plumbing is an exciting journey that combines practical skills with technical knowledge. Whether you’re a homeowner looking to save on minor repairs or a professional plumber desiring to improve your craft, understanding how to PVC plumbing can be an invaluable asset.
Understanding PVC Pipes
Before diving into the nitty-gritty of ‘How to PVC plumbing’, it’s essential to gain a solid understanding of Polyvinyl Chloride (PVC) pipes themselves, the leading player in our plumbing narrative. PVC pipes have been used in plumbing systems around the world for several decades because of their numerous beneficial properties.
PVC is a type of plastic that is highly valued in various industries due to its durability, flexibility, and cost-effectiveness. In the realm of plumbing, these characteristics translate to efficient, reliable, and affordable solutions. These non-corrosive pipes can withstand high water pressure and are immune to rust or mineral build-up, ensuring a long-lasting smooth flow.
The variance in size and strength make PVC pipes versatile enough to be used for a wide range of applications. From residential to commercial spaces, you will find them being used for sewer lines, irrigation systems, water supply lines, and more. Whether you’re dealing with cold potable water or corrosive substances, PVC pipes prove to be an excellent choice due to their non-reactive nature.
Furthermore, PVC pipes are straightforward to install and maintain. Their lightweight nature coupled with simple joining techniques means that even a DIY enthusiast can perform minor plumbing tasks. However, there are specific methods and precautions one needs to abide by while working with these pipes. This is where understanding ‘How to PVC plumbing’ becomes crucial.
One important thing to note is that PVC pipes should not be used for hot water supply lines as they have a maximum operational temperature limit. The heat can cause the pipes to warp or deform. Therefore, for high-temperature applications, CPVC (Chlorinated Polyvinyl Chloride) pipes are recommended instead which have a higher heat resistance.
The environmental impact of PVC pipes is another factor to consider. While they are highly durable and can last up to a century, they are not biodegradable and recycling them can be challenging. However, recent advancements in recycling technology are making it progressively easier to reuse these materials, mitigating some of the environmental concerns.
Understanding PVC pipes is the first vital step towards mastering ‘How to PVC plumbing’. Whether you’re a seasoned contractor or a novice DIYer, this knowledge will help you make informed decisions and execute your plumbing tasks with confidence and efficiency.
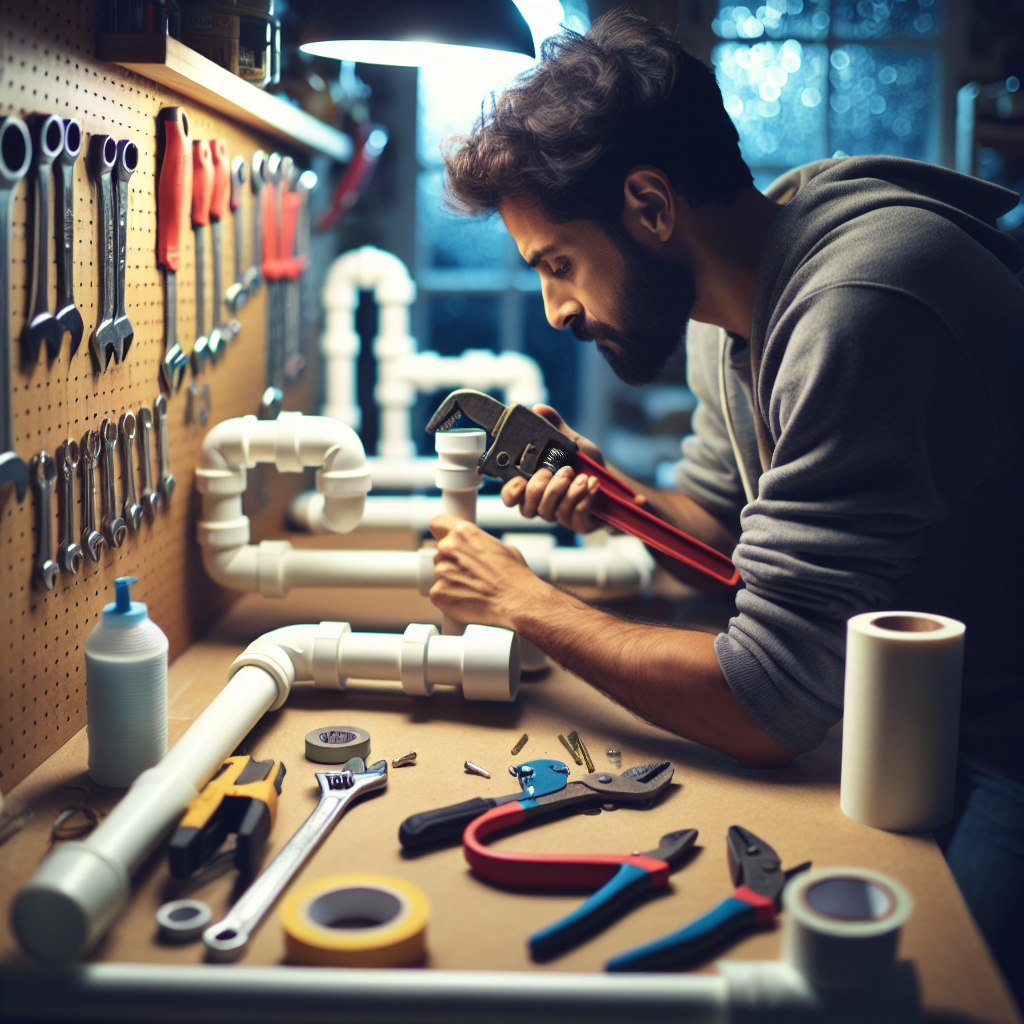
Tools Required for PVC Plumbing
When it comes to learning how to PVC plumbing, having the right tools on hand is of paramount importance. Working with PVC pipes requires a certain set of tools to ensure both efficient work and the integrity of your plumbing system. Here are some of the essential tools you will need for PVC plumbing projects.
Cutting Tools: The most basic tool you’ll need is a cutting tool to cut the pipes to the required lengths. A ratchet-style PVC cutter is ideal as it provides a smooth, clean cut. However, a hacksaw can also be used if you’re on a budget.
Miter Box: A miter box is not always necessary but can be extremely useful in ensuring straight cuts, especially if you’re using a hacksaw.
PVC Primer and Cement: These are critical components in the process of joining PVC pipes together. The primer prepares the PVC surface for bonding, while the cement ensures a strong, waterproof connection.
Deburring Tool: After cutting the PVC pipe, it’s important to remove any burrs or sharp edges that could interfere with proper fitting. A deburring tool or even fine-grit sandpaper will do the job.
Tape Measure and Marker: You’ll need these to measure and mark your PVC pipe before cutting, ensuring accuracy in your project.
Fitting Brushes: These brushes are used to apply primer and cement onto the inside of fittings and outside of pipes efficiently.
Pipe Wrench: A pipe wrench can be used to grip and turn pipes during installation or removal.
Gloves and Safety Goggles: While working on how to PVC plumbing, it is essential to prioritize safety. PVC primer and cement can be harmful if they come into contact with your skin or eyes.
Before starting any PVC plumbing project, make sure you have these tools on hand. Plumbing is a precise job and using the correct tools will not only make your task easier but also ensure a durable and leak-free system. Lastly, always remember to follow local building codes and regulations when undertaking a DIY plumbing project.
Safety Precautions in PVC Plumbing
One of the most important parts of ‘How to PVC Plumbing’ is understanding the necessary safety precautions. Whether you’re a professional plumber or a DIY enthusiast, ensuring safety should be of paramount importance. PVC (Polyvinic Chloride) is a versatile material used in various applications, including plumbing systems. While PVC plumbing is acclaimed for its durability and affordability, it requires specific safety measures during installation and maintenance.
Firstly, personal protective equipment (PPE) is essential when handling PVC plumbing. Wearing protective goggles will safeguard your eyes from dust or debris that may arise while cutting the pipes. Similarly, donning thick gloves can protect your hands from any sharp edges and prevent potential burns from heated pipe sections. It’s also recommended to wear a mask to avoid inhaling any dust.
Secondly, take extra caution during the cutting process. Always ensure that you’re using sharp tools to cut the PVC pipes to avoid unnecessary slipping or accidents. A hacksaw or a specially designed PVC cutter does an excellent job in this regard. Always secure the pipe before starting the cut and don’t rush through it; patience can be the difference between a clean cut and an accident.
Another vital safety consideration involves handling PVC cement and primer. These substances are known for their strong odors that can cause dizziness and other health issues if inhaled in large amounts over an extended period. Always work in a well-ventilated area when using these products, and consider wearing a respirator if you’ll be working with them for prolonged periods.
Bear in mind that PVC cement is also highly flammable, so keep it away from open flames or excessive heat sources during use and storage. Additionally, avoid direct contact with the skin as it may cause irritation or burns.
The disposal of leftover PVC materials is another area where safety precautions are necessary. Never burn PVC as it releases toxic fumes that are harmful to human health and the environment. Always dispose of it responsibly following your local waste management rules.
In conclusion, while learning ‘How to PVC Plumbing’ can be a rewarding and cost-effective skill, it’s crucial to prioritize safety at all times. By doing so, you’ll ensure that your project is not only successful but also carried out without risking your health or the well-being of those around you.
Step-by-Step Guide to PVC Plumbing
Learning How to PVC plumbing can be a valuable and cost-effective skill. PVC pipes are durable, easy to install, and affordable, making them an ideal choice for many plumbing projects. This step-by-step guide will help you navigate the process with ease.
Step 1: Gather Your Materials
Before starting, collect all necessary materials. You’ll need PVC pipes, PVC cement, a hacksaw, sandpaper, a measuring tape, and PVC fittings (elbows, tees, etc.). Protective gloves and goggles are also recommended for safety.
Step 2: Measure and Cut
Measure the length of pipe needed using your tape measure. Mark the necessary length on the PVC pipe. Using your hacksaw, carefully cut the pipe where marked. It’s always a good idea to cut a bit longer than needed—you can always trim it down later.
Step 3: Smooth the Edges
The cut edges of the PVC pipe will likely be rough. Use your sandpaper to smooth any rough or jagged edges on both the outside and inside of the pipes. This will ensure a better fit and prevent leaks.
Step 4: Test Fit The Pieces
Before applying any adhesive, dry-fit all your pieces together to make sure they align correctly. This step is crucial because once you use cement on PVC pipes, they’re permanently bonded.
Step 5: Apply The Cement
If all pieces fit correctly, disassemble them and start applying PVC cement. Apply it generously on both the fitting and the pipe end but avoid getting it inside the pipe. Once applied, quickly assemble the pieces as the cement dries rapidly.
Step 6: Let It Dry
After assembling, hold the pieces together for about 30 seconds to prevent them from popping apart. Then, let your project sit undisturbed to fully dry. The drying time can vary from a few minutes to an hour depending on the cement brand and environmental conditions.
Now you know how to PVC plumbing! With these steps, you should be able to handle most basic plumbing projects. Remember, safety first! Always use goggles and gloves to protect yourself while working.
Cutting and Measuring PVC Pipes
When dealing with a project like PVC plumbing, it’s crucial to know how to accurately cut and measure PVC pipes. This task may seem intimidating at first, but with the right tools and techniques, you can easily handle it yourself. Here’s a brief guide on ‘How to PVC plumbing’ specifically focusing on cutting and measuring.
Firstly, it’s essential to have the right tools on hand. For cutting PVC pipes, you can use a hacksaw or a PVC cutter. While a hacksaw is more common and can certainly get the job done, a PVC cutter will offer cleaner cuts with less effort.
In order to measure the pipe accurately, you will need a measuring tape or ruler. Always remember that when it comes to plumbing, measurements are essential. An error in measurement could result in leaks or poor fitting connections. So, always double-check your measurements before making any cuts.
Start by measuring the length of pipe you need for your project. Mark this length on your pipe using a marker or pencil. It’s important to mark all the way around the pipe to ensure that your cut is straight. If your measurement is off at any point along the circumference of the pipe, you’ll end up with an angled cut which might not fit properly.
Once you’ve marked your pipe, it’s time to cut. If you’re using a hacksaw, make sure that the blade is sharp and the saw is held securely. Start your cut on one side of your marked line and slowly work your way around the pipe. If you’re using a PVC cutter, simply line up the blade with your marked line and squeeze the handles together until the cutter slices through the pipe.
After cutting, there may be some rough edges leftover from where the saw or cutter passed through. You can smooth these out using sandpaper or a file. Smooth edges will ensure a better fit and reduce the chance of leaks.
Furthermore, remember to always cut slightly more than necessary, taking into account the space that will be occupied by the fittings. You can then trim it down to the exact size once you fit it into place. This helps in avoiding any shortage or fit problems.
And there you have it, with the right tools and careful measurements, cutting and measuring PVC pipes for your plumbing needs can be a straightforward task.
Joining PVC Pipes Together
One of the most important aspects of PVC plumbing is learning how to properly join PVC pipes together. The process requires attention to detail and understanding of proper techniques to ensure a leak-free, lasting connection. So let’s discuss ‘How to PVC Plumbing’ with a focus on joining PVC pipes.
PVC (polyvinic chloride) is a versatile material commonly used in plumbing because it’s durable, affordable, and easy to work with. Joining PVC pipes involves cutting the pipe to the right length, preparing the ends for joining, applying a primer and then a solvent cement before fitting them together.
First and foremost, measure and mark the pipe where you want to make your cut. Use a PVC cutter or saw to cut through the pipe at your mark. Remember that accuracy is essential – an inaccurate cut can result in a poor fit and leaks down the line.
Once cut, you’ll need to prepare the ends of the pipe for joining. This involves removing any burrs or rough edges from your cut using sandpaper or deburring tool. It’s crucial to ensure your cuts are smooth and clean as rough edges can prevent a tight seal.
The next step involves applying a purple primer to both the outside end of your pipe and inside of your fitting. The primer helps to clean and soften the PVC surface so the solvent cement can create a stronger bond. It’s important not only to apply it thoroughly but also allow it time to dry.
After the primer has dried, you’ll apply solvent cement. Solvent cement actually softens the PVC material so when it re-hardens, it forms one continuous piece of plastic. Apply it generously but carefully on both surfaces (pipe end and inside of fitting), avoiding any spillage as it can damage other parts of your pipe.
Once you’ve applied the solvent cement, quickly and firmly push the pipe into the fitting, give it a quarter turn and hold it in place for about 30 seconds. This will ensure a secure fit. Then, leave it to cure for at least 15 minutes before handling and a minimum of 2 hours before testing with water.
Remember, safety is paramount. Always work in a well-ventilated area as PVC primer and solvent cement produce strong fumes. Use proper protective gear like gloves and safety glasses to prevent direct contact.
With these steps, you now know how to join PVC pipes together efficiently and effectively when working on your PVC plumbing projects. Although it may seem daunting at first, with a little practice, you’ll find that it’s an easy process to master.
Testing Your PVC Plumbing
PVC (polyvinyl chloride) plumbing is an essential part of many household and industrial systems. With its durability, affordability, and ease of use, it’s become a popular choice for many plumbers and DIY enthusiasts. However, it’s crucial to test your PVC plumbing after installation to ensure everything is properly fitted and leak-free. Here, we’re going to guide you on ‘how to PVC plumbing’ testing.
To start with, make sure you have all the necessary tools for the job: a bucket, water source, and a marker. The first step is to visually inspect your PVC pipes. Look for any signs of cracks, leaks or loose fittings. Any abnormalities should be marked with your marker so you can go back and fix them later.
Next, perform a water test. Plug up all drain openings in the system you’re testing and fill it with water. This will put pressure on your pipes and reveal any leaks that weren’t visible during the initial inspection. If your system holds the water without any noticeable decrease in level over an extended period (at least 15 minutes), it is likely that your system is sound. However, if you notice drops in water level or accumulation of water underneath the pipework, then there might be some leaks.
If you’ve identified any leaks during the water test phase, you need to drain the system and then repair or replace the leaking sections before re-testing it. It’s critical not to ignore even small leaks as they can cause significant damage over time.
In case of larger systems or when a professional inspection is required, an air test can be performed using specialized inflatable test balls or plugs and an air compressor. But remember, this should only be carried out by a qualified professional as over pressurization could lead to damaging PVC pipes or fittings.
Finally, don’t forget to check the function of any valves in your PVC plumbing. By turning them off and on while the system is pressurized with water, you can ensure they are sealing correctly and operating smoothly.
Remember, a successful PVC plumbing project is not just about installation but also about regular testing and maintenance. By taking the time to thoroughly test your PVC plumbing, you can avoid potential issues down the line and ensure a long-lasting, efficient system.
Troubleshooting Common PVC Plumbing Problems
When working with PVC plumbing, it’s inevitable that you may come across some issues along the way. Understanding how to troubleshoot these problems can save you time and stress in the long run. Here are some common PVC plumbing problems that you might encounter and tips on how to resolve them.
PVC Pipe Leaks: One of the most common problems associated with PVC plumbing is pipe leakage. This can be due to a number of reasons such as faulty seals or cracked pipes. How to pvc plumbing effectively involves regularly inspecting your lines for any signs of damage. For minor leaks, use a PVC repair coupling which allows you to fix a small section without having to replace the entire pipe. For larger leaks, you may need to replace the whole section of pipe.
Clogged Pipes: Another common issue is clogged pipes. Often, these can be cleared using a plunger or a plumber’s snake. However, if the clog is stubborn, you may have to disassemble some of the piping to remove the blockage. It’s critical to remember to turn off your water supply before attempting this as water pressure can cause serious injury.
Loose Fittings: Loose fittings can cause leaks and other issues. To address loose fittings, first, ensure that they’re correctly sized for your pipes. If they are but still seem loose, consider using a joint compound or thread seal tape to create a more secure fit.
Burst Pipes: Extreme temperatures can cause PVC pipes to burst. In mild climates, simply insulating your pipes may prevent this problem. However, in areas with severe winter weather, burying pipes deeper in the ground or insulating them with special heat tape could be necessary.
Glue Issues: One of the tricky parts of PVC plumbing is the gluing process. If not done correctly, it can lead to leaks. Always ensure you use a primer before applying the glue to help it bond better. Additionally, give ample time for the glue to dry before testing your plumbing.
By understanding these common problems and knowing how to troubleshoot them, you can ensure that your PVC plumbing job is done right the first time, saving you both time and money in the long run.
Maintenance Tips for PVC Plumbing
Once you’ve learned ‘how to PVC plumbing’, ensuring that your new PVC pipes stay in tip-top condition is the next crucial step. Proper maintenance of your PVC plumbing system can extend its lifespan, prevent leaks, and save you from costly repairs down the line. Below are some maintenance tips for PVC plumbing:
1. Regular Inspection:
Start by conducting regular inspections. Check your PVC pipes regularly for any signs of cracks, leaks, or damage. Early detection can save you from significant repairs or replacements. Look out for any damp spots, mildew, or mould around your pipes as they could indicate a hidden leak.
2. Avoid Chemical Drain Cleaners:
While it might be tempting to use chemical drain cleaners to clear clogs in your pipes, they can actually do more harm than good. These chemicals can corrode and weaken your PVC pipes over time, leading to potential leaks or bursts. Instead of chemical cleaners, opt for more natural methods like plunging or using a plumber’s snake.
3. Protect Your Pipes From Extreme Temperatures:
PVC pipes can become brittle and crack in extreme cold temperatures while hot temperatures can cause the pipes to warp or soften. If you live in an area where temperatures fluctuate greatly, consider insulating your pipes to protect them from the elements.
4. Proper Installation:
Proper installation plays a critical role in the maintenance of PVC plumbing systems. Ensure that all joints are correctly glued as loose joints can lead to leaks over time. Also, make sure that the pipes are adequately supported to prevent sagging and stress on certain areas.
5. Avoid Excessive Pressure:
Excessive water pressure can strain your PVC pipes and lead to cracks and leaks over time. If you notice that your water pressure is consistently high, consider installing a pressure reducing valve to safeguard your pipes.
Remember, PVC plumbing maintenance doesn’t have to be a daunting task. By following these simple steps, you can ensure that your PVC plumbing system will serve you well for many years to come. But if you’re ever unsure about how to maintain your PVC plumbing, don’t hesitate to seek the help of a professional plumber.
Wrap Up: The Advantages and Disadvantages of PVC Plumbing
After explaining the basics of how to PVC plumbing, let’s wrap up by summarizing the advantages and disadvantages associated with this type of piping material. The decision to use PVC pipes in your plumbing projects largely depends on your individual needs and circumstances.
Firstly, we’ll look at the advantages. PVC plumbing is lauded for its cost-effectiveness. Compared to metal pipes, PVC supplies are relatively inexpensive, which makes it a preferred option for many homeowners looking to cut costs. In addition, PVC is remarkably lightweight and easy to handle, making it a popular choice for DIY enthusiasts learning how to PVC plumbing.
Furthermore, PVC plumbing is resistant to corrosion and chemical damage, which adds to its overall durability. Its smooth interior walls don’t encourage sediment buildup, ensuring optimal water flow. Not forgetting its resistance to high water pressure and temperatures, which further enhances its longevity.
However, despite these numerous advantages, there are also a few disadvantages worth considering. One primary concern is that PVC pipes are not suited for hot water supply lines as these pipes can warp under high temperatures. For hot water plumbing systems, CPVC (chlorinated polyvinyl chloride) pipes are recommended instead.
Another disadvantage is the environmental concerns tied to the manufacturing and disposal of PVC materials. These procedures emit harmful toxins into the environment and pose significant health risks. Consequently, if you’re keen on green building practices or sustainability in general, you might want to consider other eco-friendly alternatives.
In summary, how to PVC plumbing involves weighing the pros and cons of this specific pipe material based on your project’s needs and requirements. While PVC provides affordability and durability ideal for certain applications like cold water supply lines and drain-waste-vent (DWV) systems, it may not be suitable for hot water systems or sustainable building practices due to its temperature limitations and potential environmental impact.
As always, consulting with a professional plumber or plumbing supplier can provide invaluable insight into whether PVC is the best choice for your specific project.